
Quick answer: Yoast SEO is a free WordPress plugin that helps your pages show up and look good in Google. To use it, install and activate it, run the 5-step first-time configuration, and check a few key settings. Then, for every post, set a focus keyphrase, fix the red and orange items in the SEO and readability analysis, and write an SEO title and meta description before you publish. Yoast handles XML sitemaps, schema markup and canonical tags for you in the background.
This guide walks you through every screen, in the order you will meet them. Each step has a real screenshot, with numbered orange markers showing exactly where to click.
All screenshots come from a fresh WordPress 7.1.3 site running Yoast SEO 28.7, the version released on October 13, 2026. The demo website is a fictional dental clinic, Bright Smile Dental Clinic, so you can follow one real example from installation to a published, optimized post.
By the end, you will know how to:
- install Yoast SEO and complete the first-time configuration
- choose the right settings for posts, pages, categories, tags and archives
- optimize a blog post using the focus keyphrase, SEO analysis and readability analysis
- control how your post looks in Google with the search appearance preview
- track your scores, edit titles in bulk and find your XML sitemap
- decide whether Yoast SEO Premium is worth paying for
New to SEO? Read what is SEO and on-page SEO first. They explain the ideas Yoast is checking for.
Yoast SEO does two jobs. In the background, it handles technical SEO: it writes your meta tags, canonical URLs, XML sitemaps and schema markup. While you write, it acts as a checklist, telling you with red, orange and green lights what to improve before you publish.
It is the most-used SEO plugin on WordPress. The WordPress.org plugin directory lists more than 10 million active installations and a 96/100 rating from 27,820 reviews (WordPress.org).
The free version is enough for most blogs and small business sites. Here is what changes when you pay for Premium:
| Feature | Yoast SEO (free) | Yoast SEO Premium |
|---|---|---|
| Focus keyphrases per post | 1 | Up to 5, with synonyms and word forms |
| SEO and readability analysis | Yes | Yes, plus extra checks such as word complexity |
| Google preview, SEO title, meta description | Yes | Yes, plus AI-generated title and description suggestions |
| XML sitemaps, schema, breadcrumbs, canonical URLs | Yes | Yes, with more schema types |
| Bulk editor for titles and descriptions | Yes | Yes, plus AI drafts |
| Redirect manager | No | Yes |
| Internal linking suggestions | No | Yes |
| Social media previews | No | Yes |
| Support | No direct support | 24/7 support |
| Price | Free | $118.80 a year for one site, excluding VAT |
Sources: Yoast SEO Premium product page and Yoast SEO free vs Premium. Throughout the plugin, Premium features carry a yellow lock or a “Premium” label, so you will always know which is which.
Step 1: Install and activate Yoast SEO
You install Yoast SEO like any other plugin, straight from your WordPress dashboard. It takes about a minute.
- In your WordPress dashboard, go to Plugins → Add Plugin (marker 1).
- Type Yoast SEO in the search box (marker 2).
- On the card titled “Yoast SEO – Advanced SEO with real-time guidance and built-in AI”, by Team Yoast, click Install Now (marker 3). Wait a few seconds, then click Activate.
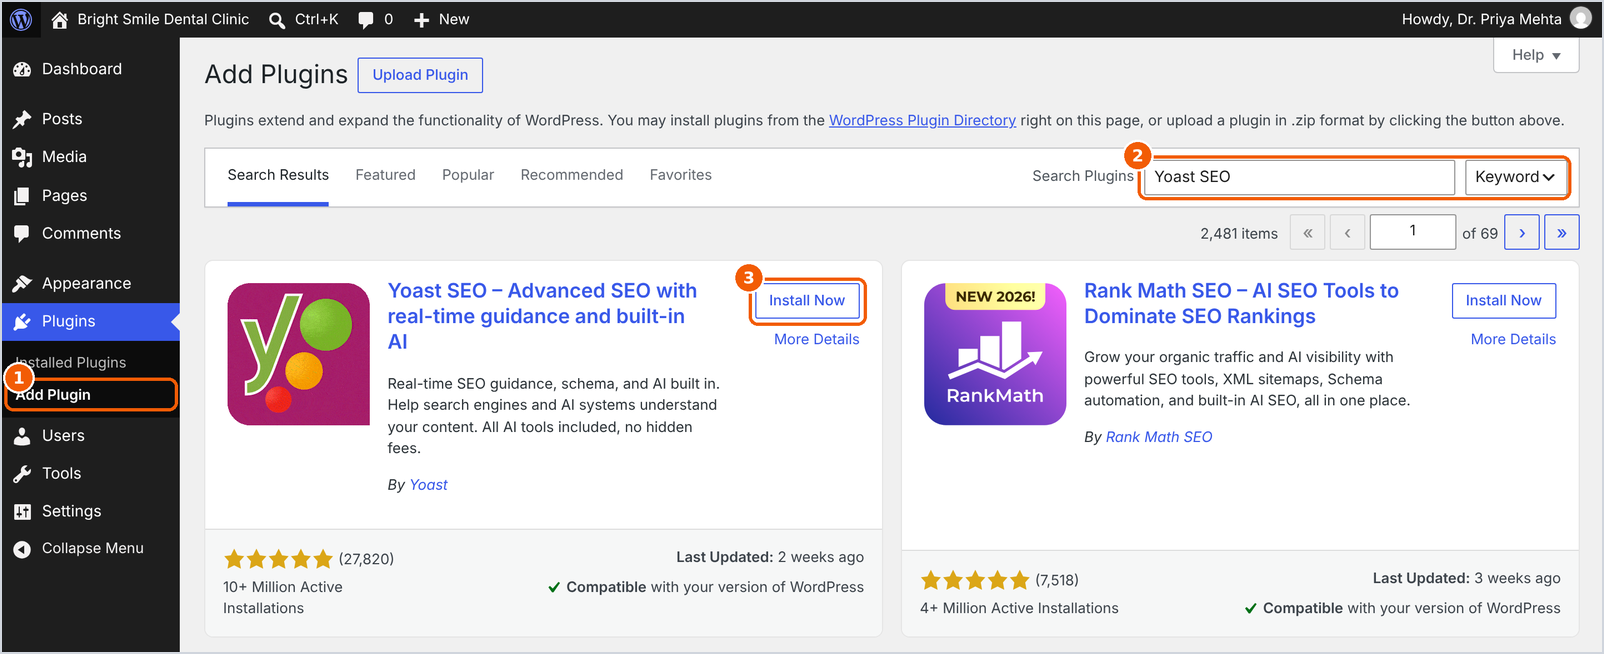
Figure 1: Search for Yoast SEO under Plugins → Add Plugin, then click Install Now.
Make sure you pick the plugin by Yoast. Several add-ons, such as “ACF Content Analysis for Yoast SEO”, also contain “Yoast” in the name.
After activation, you land on the Plugins screen. A new Yoast SEO item appears in the left menu (marker 2), and a red notification badge appears in the top bar. Click Finish your first-time configuration under the plugin name (marker 1) to start the setup.
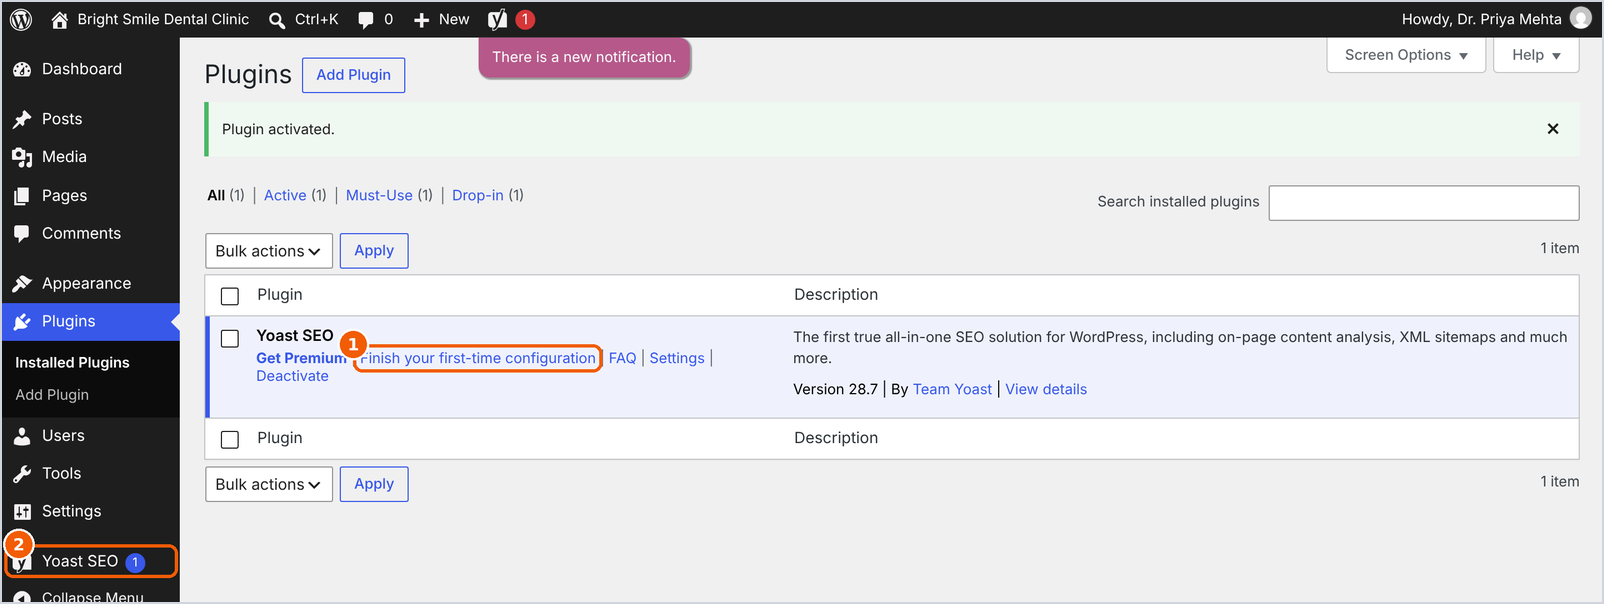
Figure 2: After activation, click “Finish your first-time configuration”. The Yoast SEO menu is now in your sidebar.
Important: run only one SEO plugin at a time. If you are switching from Rank Math or All in One SEO, import your data first with Yoast SEO → Tools → Import and Export, then deactivate the old plugin. Two SEO plugins will print duplicate titles, descriptions and schema.
Step 2: Complete the first-time configuration
The first-time configuration is a 5-step wizard that tells Google who is behind your website. You can always reopen it from Yoast SEO → General → First-time configuration, and each finished step gets an Edit button.
2.1 SEO data optimization
Yoast scans your site and builds a database of SEO data. This does not change any content or settings; it only speeds up Yoast and powers features like the internal link counter.
On a large site, click Start SEO data optimization and leave the tab open until it finishes. On a new or small site, Yoast often finishes on its own and shows “We’ve already successfully analyzed your site”, as below. Click Continue.
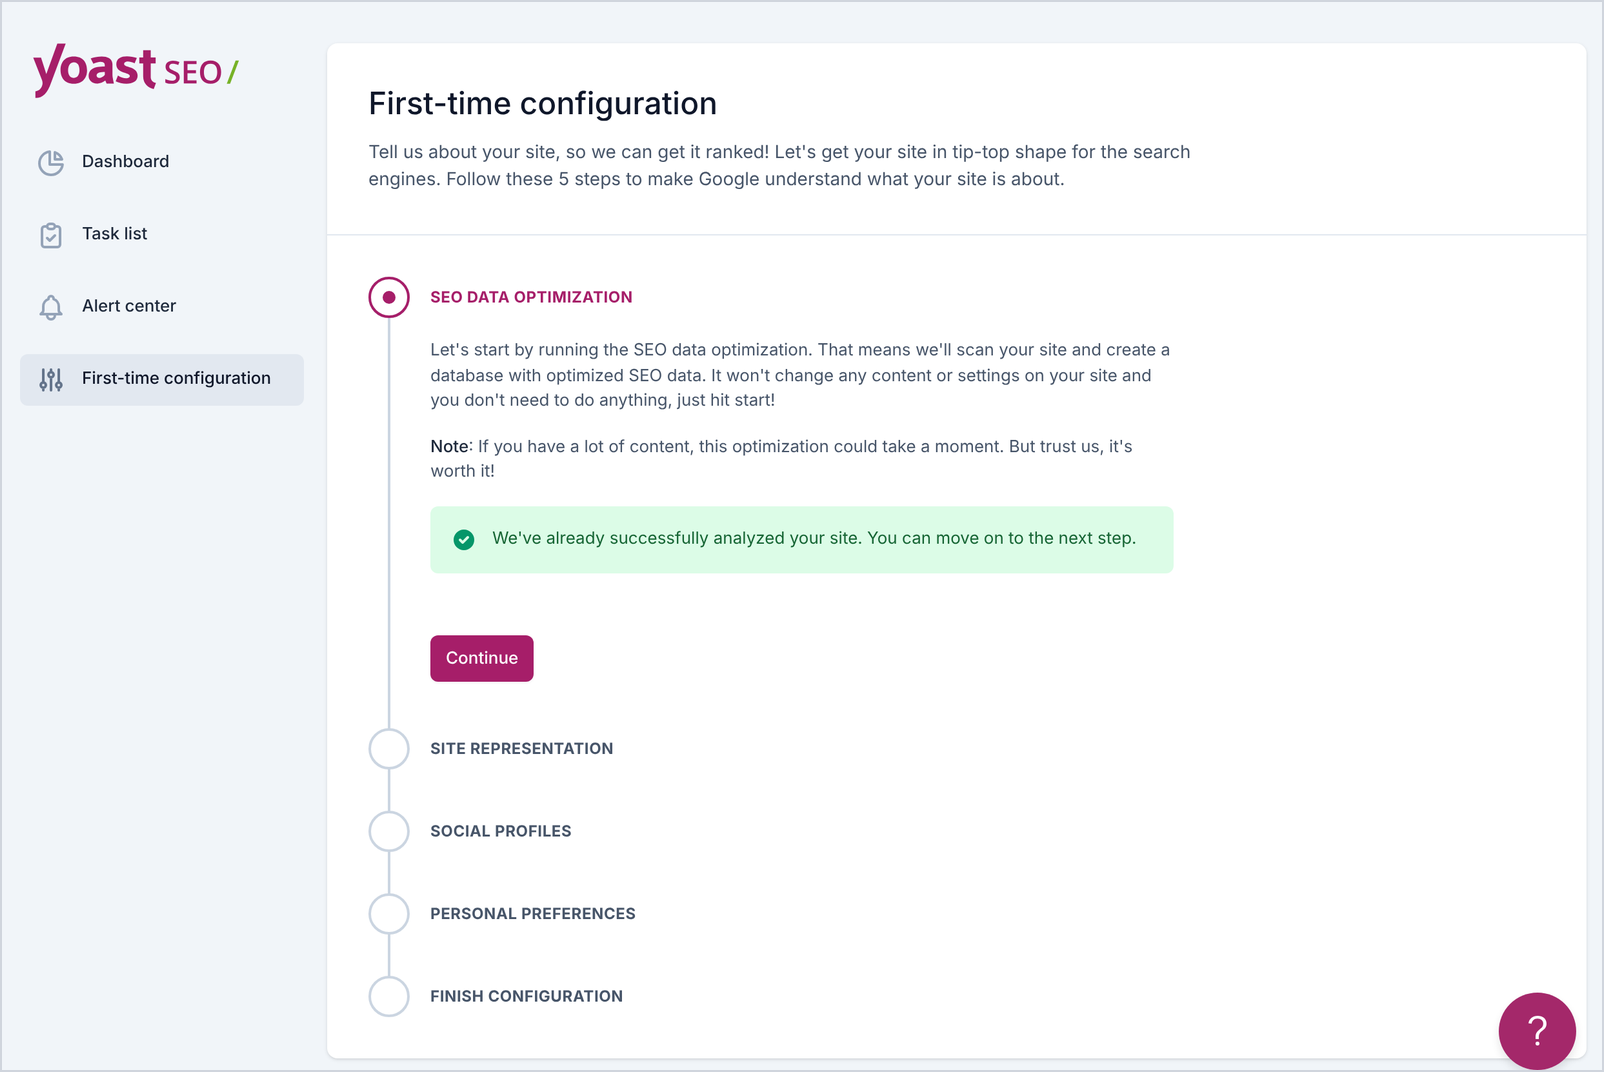
Figure 3: Step 1, SEO data optimization. The four remaining steps are listed underneath.
2.2 Site representation
This step feeds the structured data (schema) that tells Google whether your site belongs to a business or a person.
- Under Does your site represent an Organization or Person? (marker 1), choose Organization for a business, clinic, law firm or brand. Choose Person for a personal blog or portfolio, then pick your WordPress user.
- Check the Website name and Organization name. Use your real business name, written the same way as on your Google Business Profile.
- Under Organization logo (marker 2), click Select image and choose your logo from the media library.
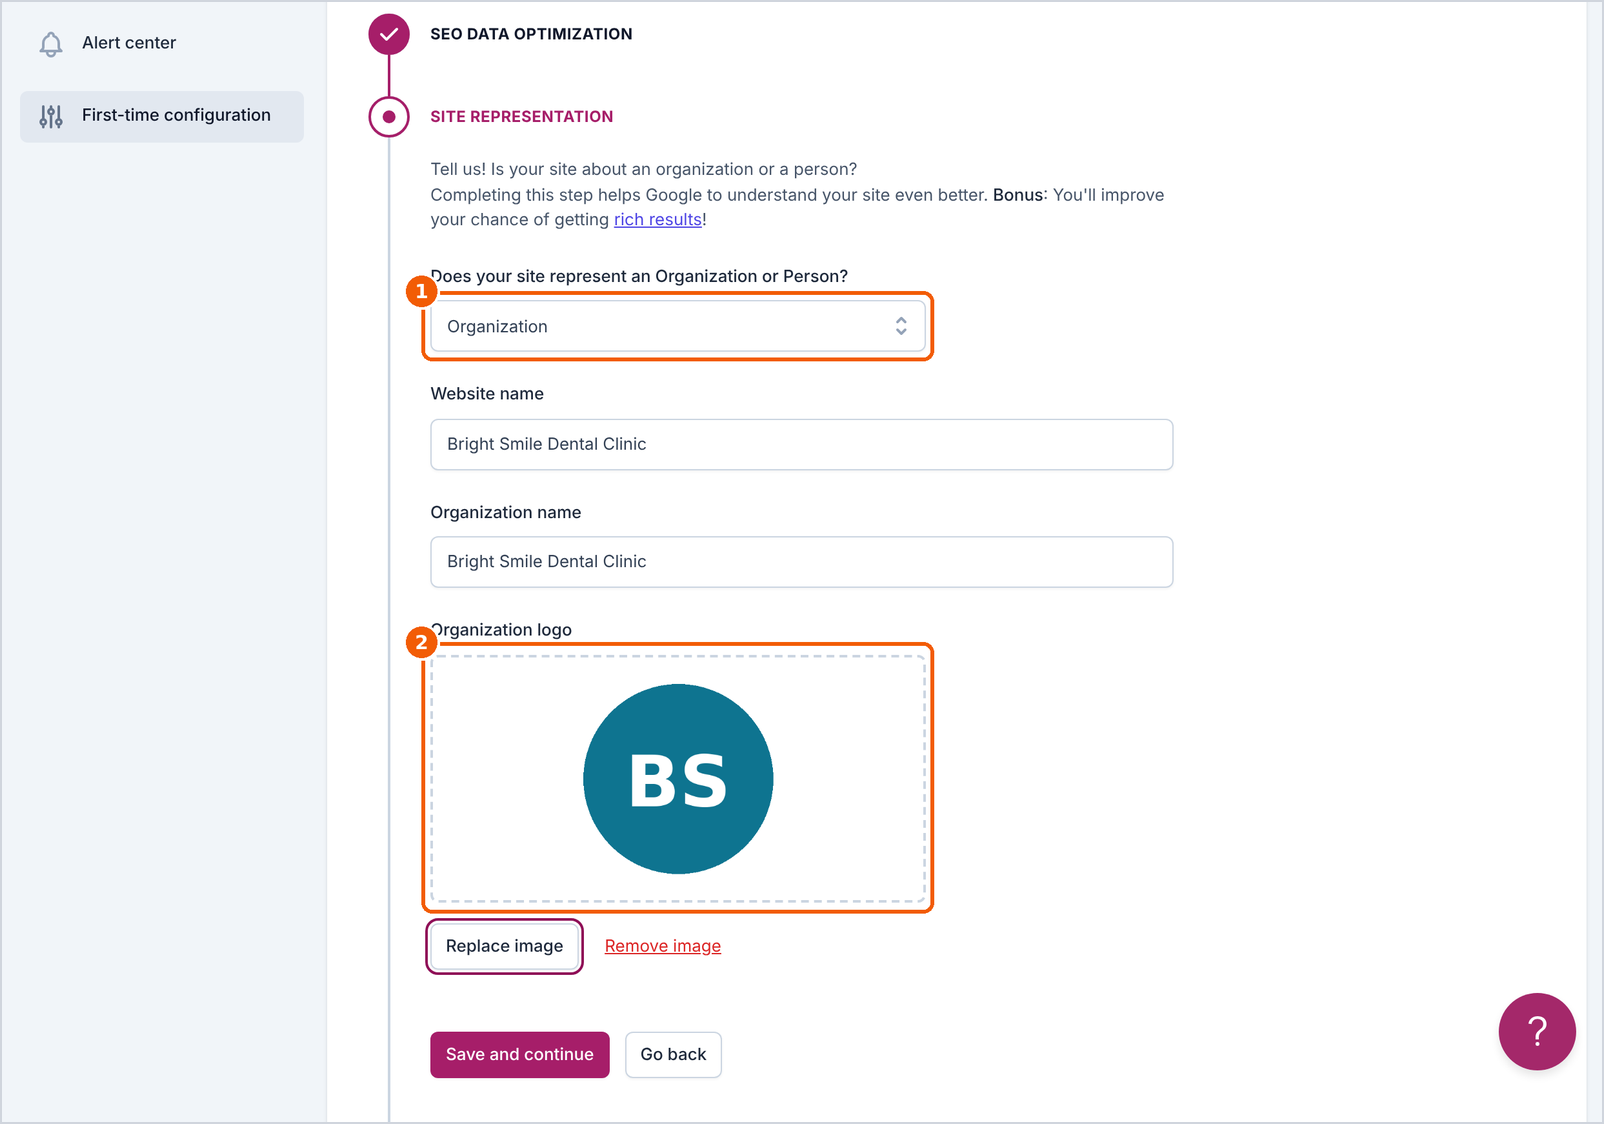
Figure 4: Step 2, Site representation. Choose Organization or Person, confirm your names and add a logo.
Click Save and continue.
2.3 Social profiles
Add the full URLs of your official social media pages. Facebook and X have their own fields; click Add another profile for Instagram, LinkedIn, YouTube or any other profile. Yoast adds these links to your schema so search engines can connect your accounts to your website.
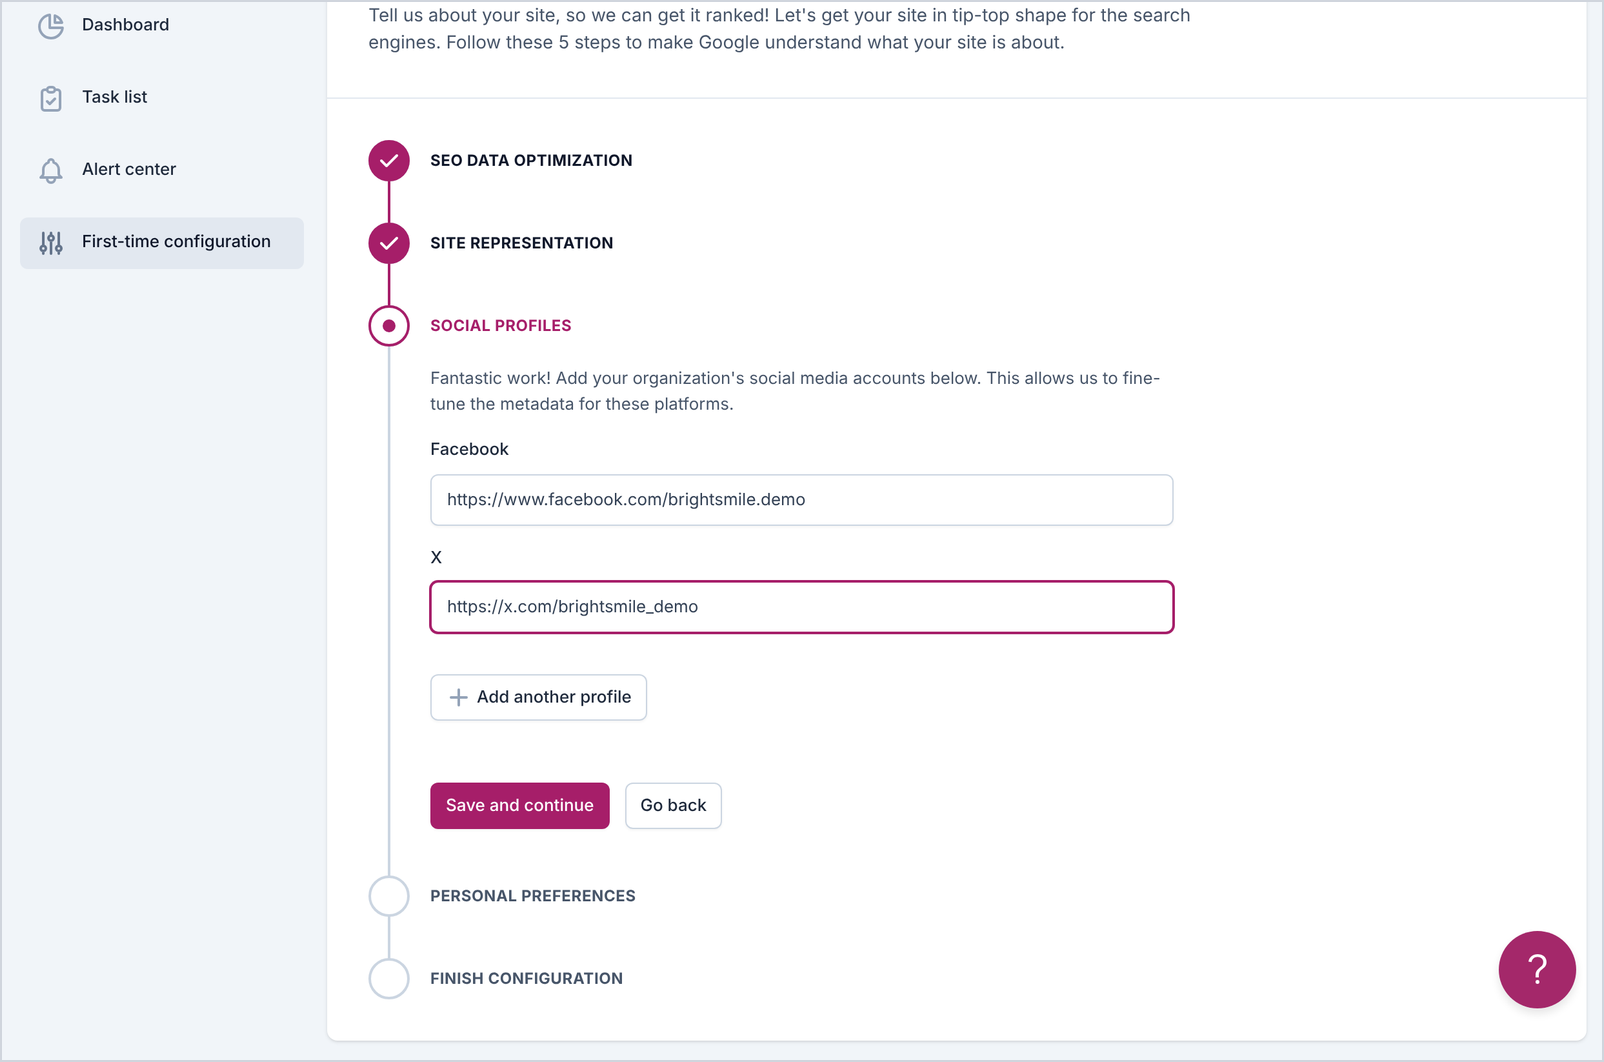
Figure 5: Step 3, Social profiles. Paste the full URL of each profile.
Only add profiles you actually own and keep up to date. Then click Save and continue.
2.4 Personal preferences
This step has two optional choices: subscribing to Yoast’s newsletter, and whether Yoast may collect anonymous usage data about your site. Neither choice affects your SEO. Pick what you are comfortable with and click Save and continue.
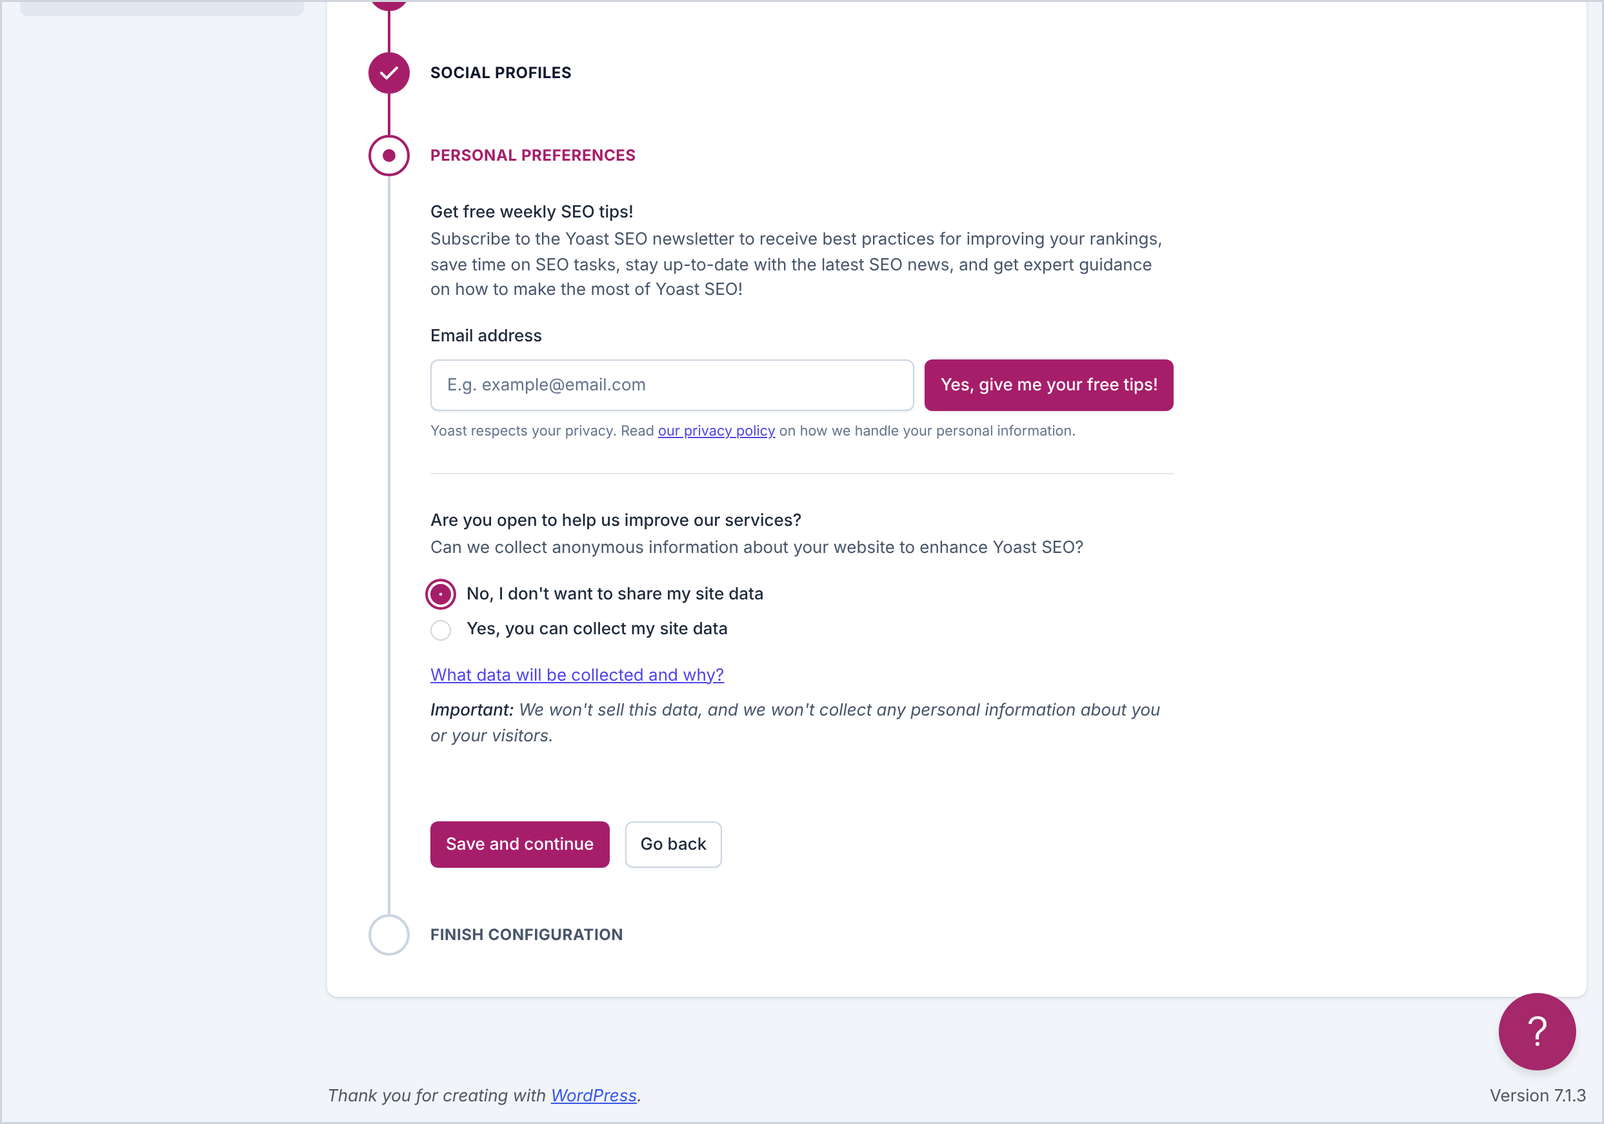
Figure 6: Step 4, Personal preferences. Both options are optional.
2.5 Finish configuration
All five steps now show a check mark, and Yoast confirms “Setup complete! Your site is now ready for discovery.”
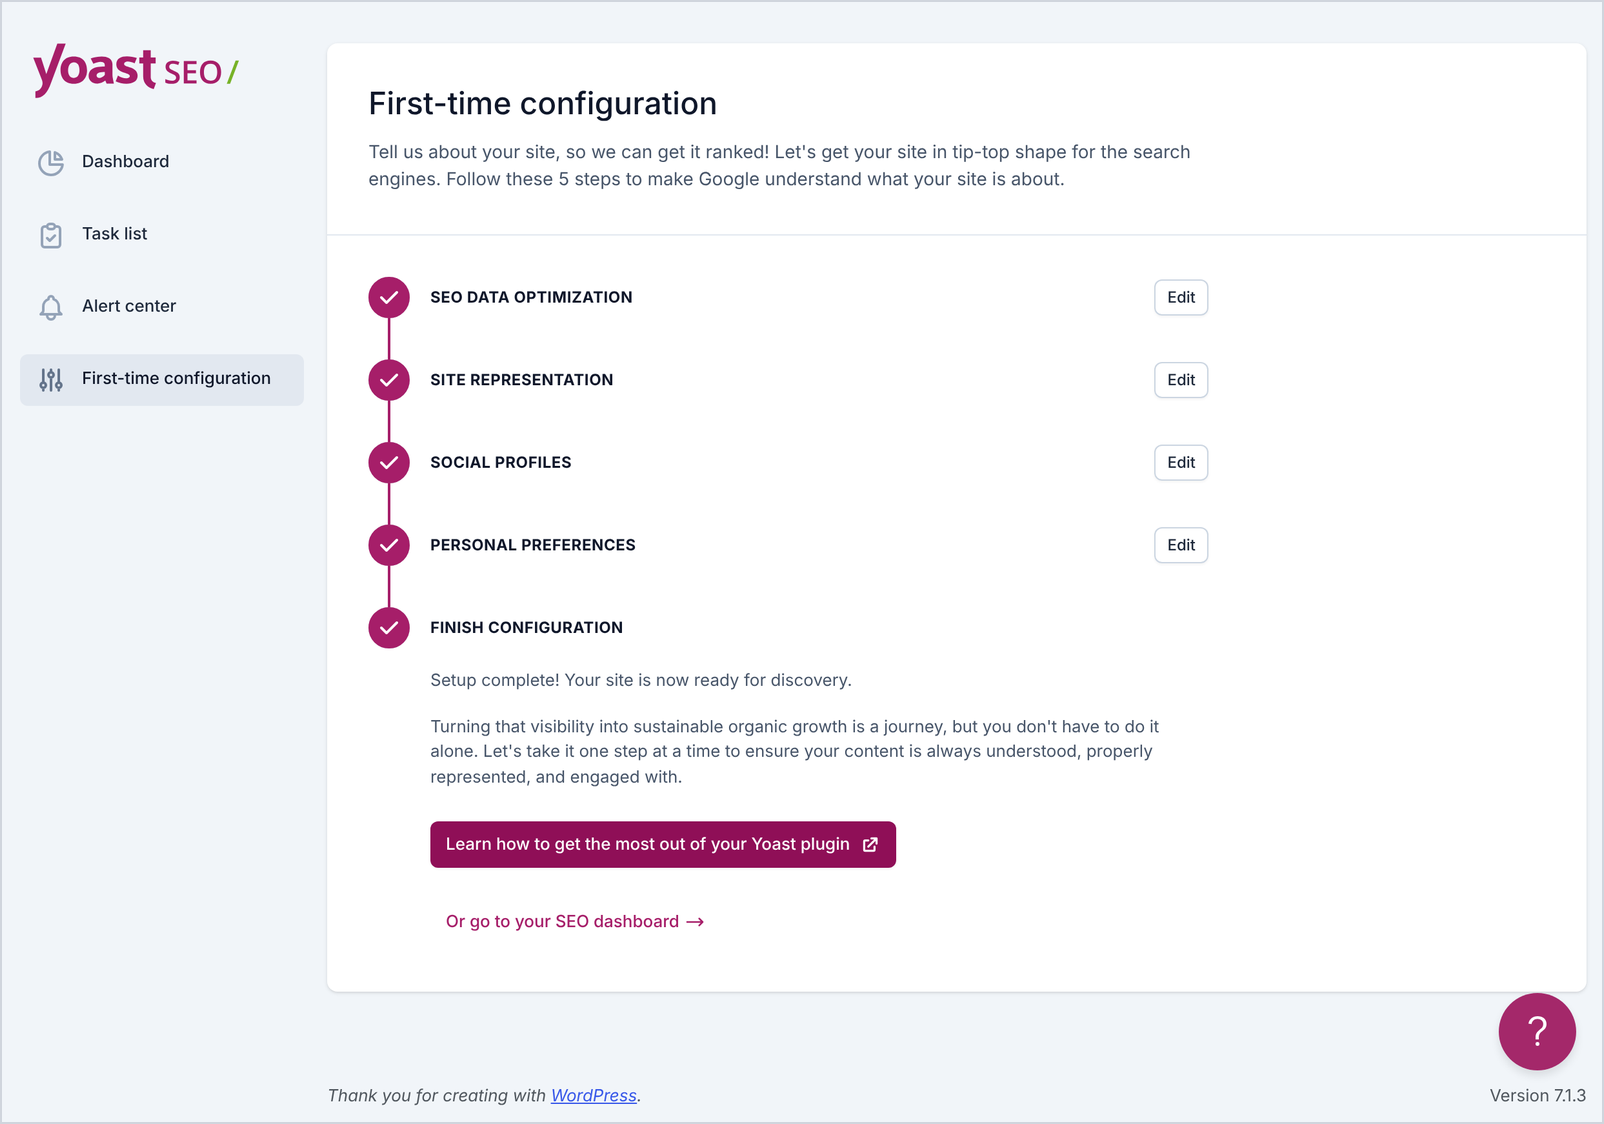
Figure 7: Setup complete. Each step keeps an Edit button if you need to change it later.
Step 3: Check the settings that matter
Open Yoast SEO → Settings. The left menu has four groups: General, Content types, Categories & tags and Advanced. The defaults are sensible, so you only need to check the screens below. Click Save changes at the bottom of any screen you edit.
Site features: switch features on or off
General → Site features lists every Yoast feature with an on/off switch, grouped into AI tools, Content optimization, Site structure, Technical SEO, Social sharing and Tools.
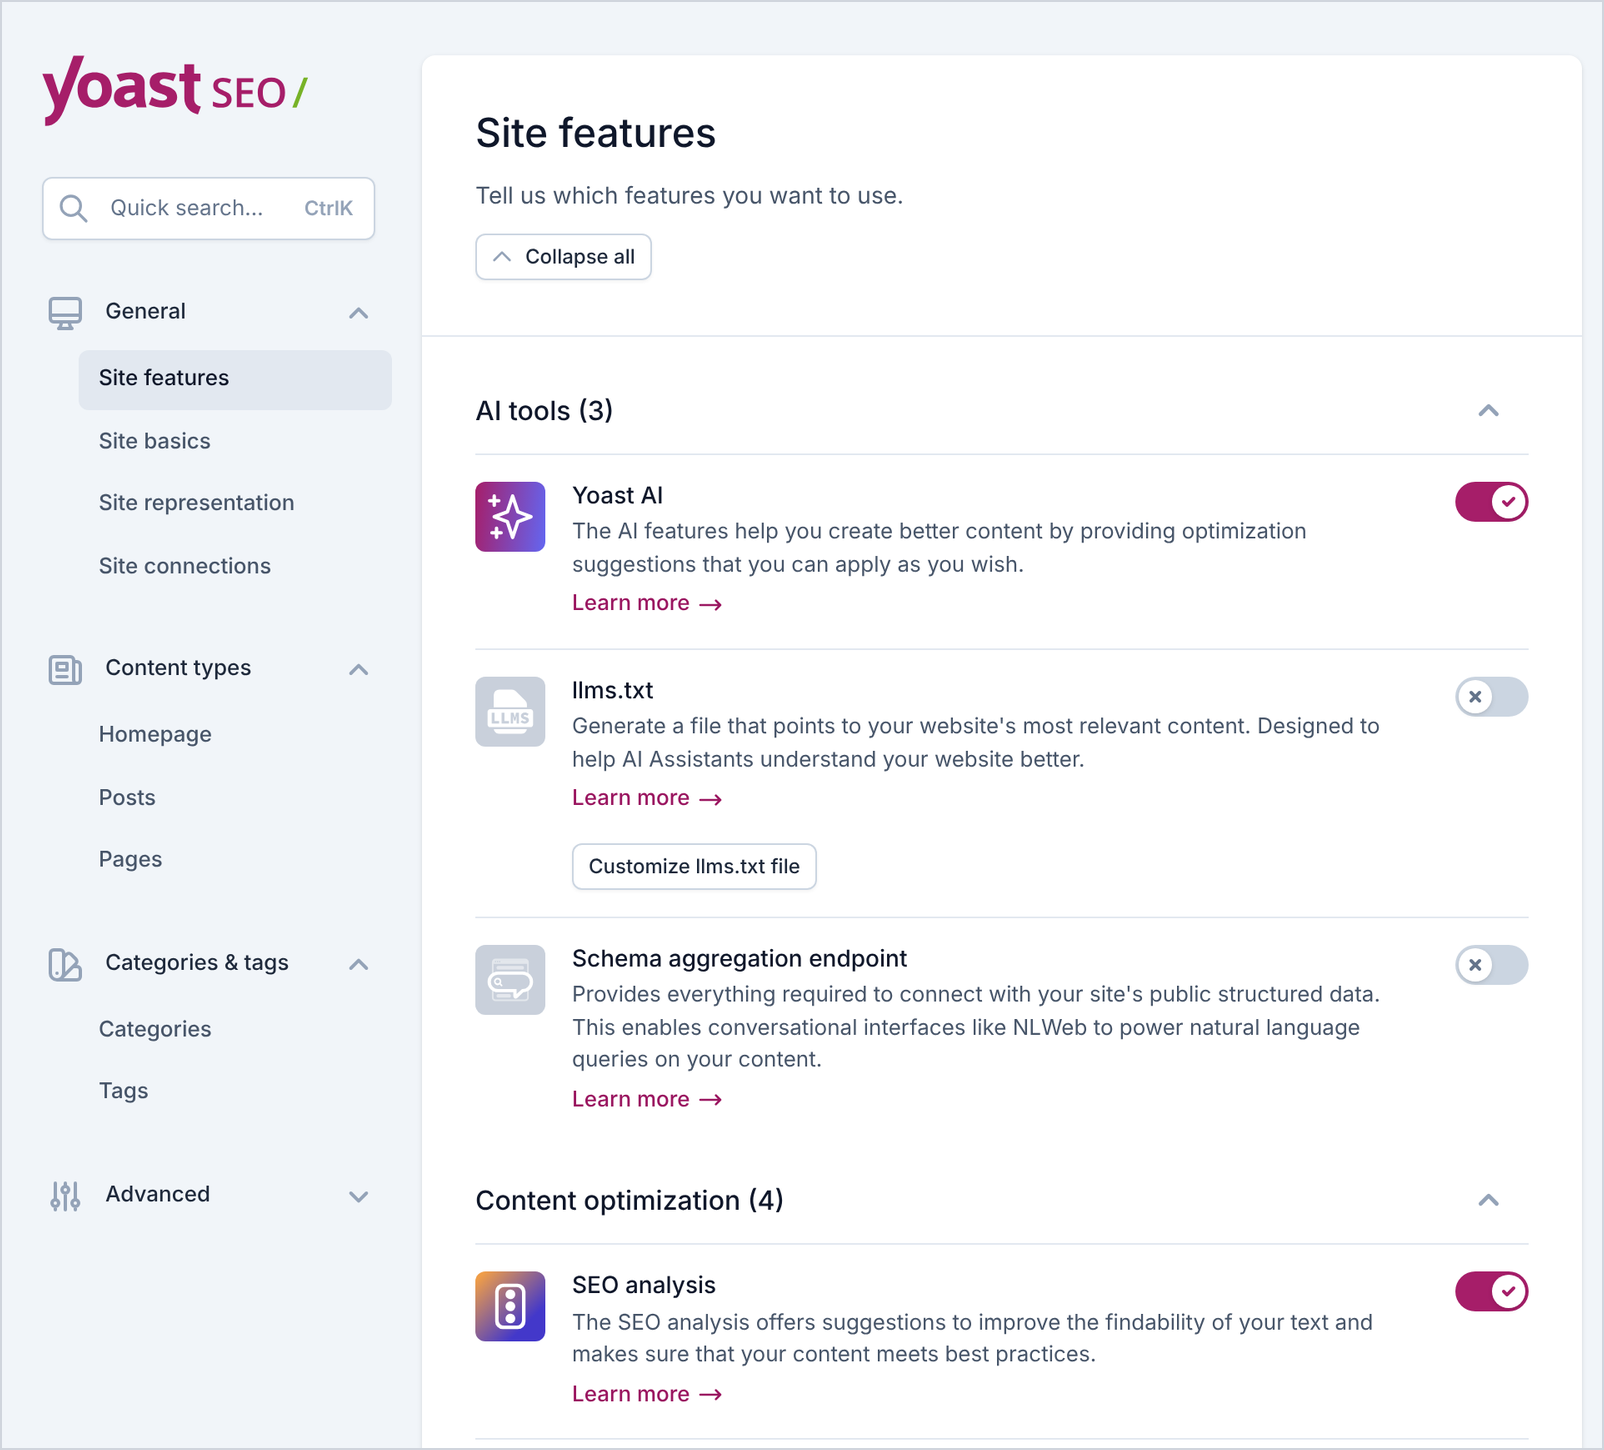
Figure 8: General → Site features. Each switch turns a feature on or off for the whole site.
Keep these switched on: SEO analysis, Readability analysis, Cornerstone content, Text link counter, XML sitemaps, Open Graph data and X card data. Features marked “Unlock with Premium”, such as internal linking suggestions and IndexNow, only work after you upgrade.
Site basics: name, tagline and separator
General → Site basics holds your website name, tagline and the title separator, the small character between your post title and site name in Google (for example “Post title – Site name”). The default dash is fine.
Also set a Site image. Yoast uses it when a page without its own image is shared on social media; the recommended size is 1200 × 675 pixels.
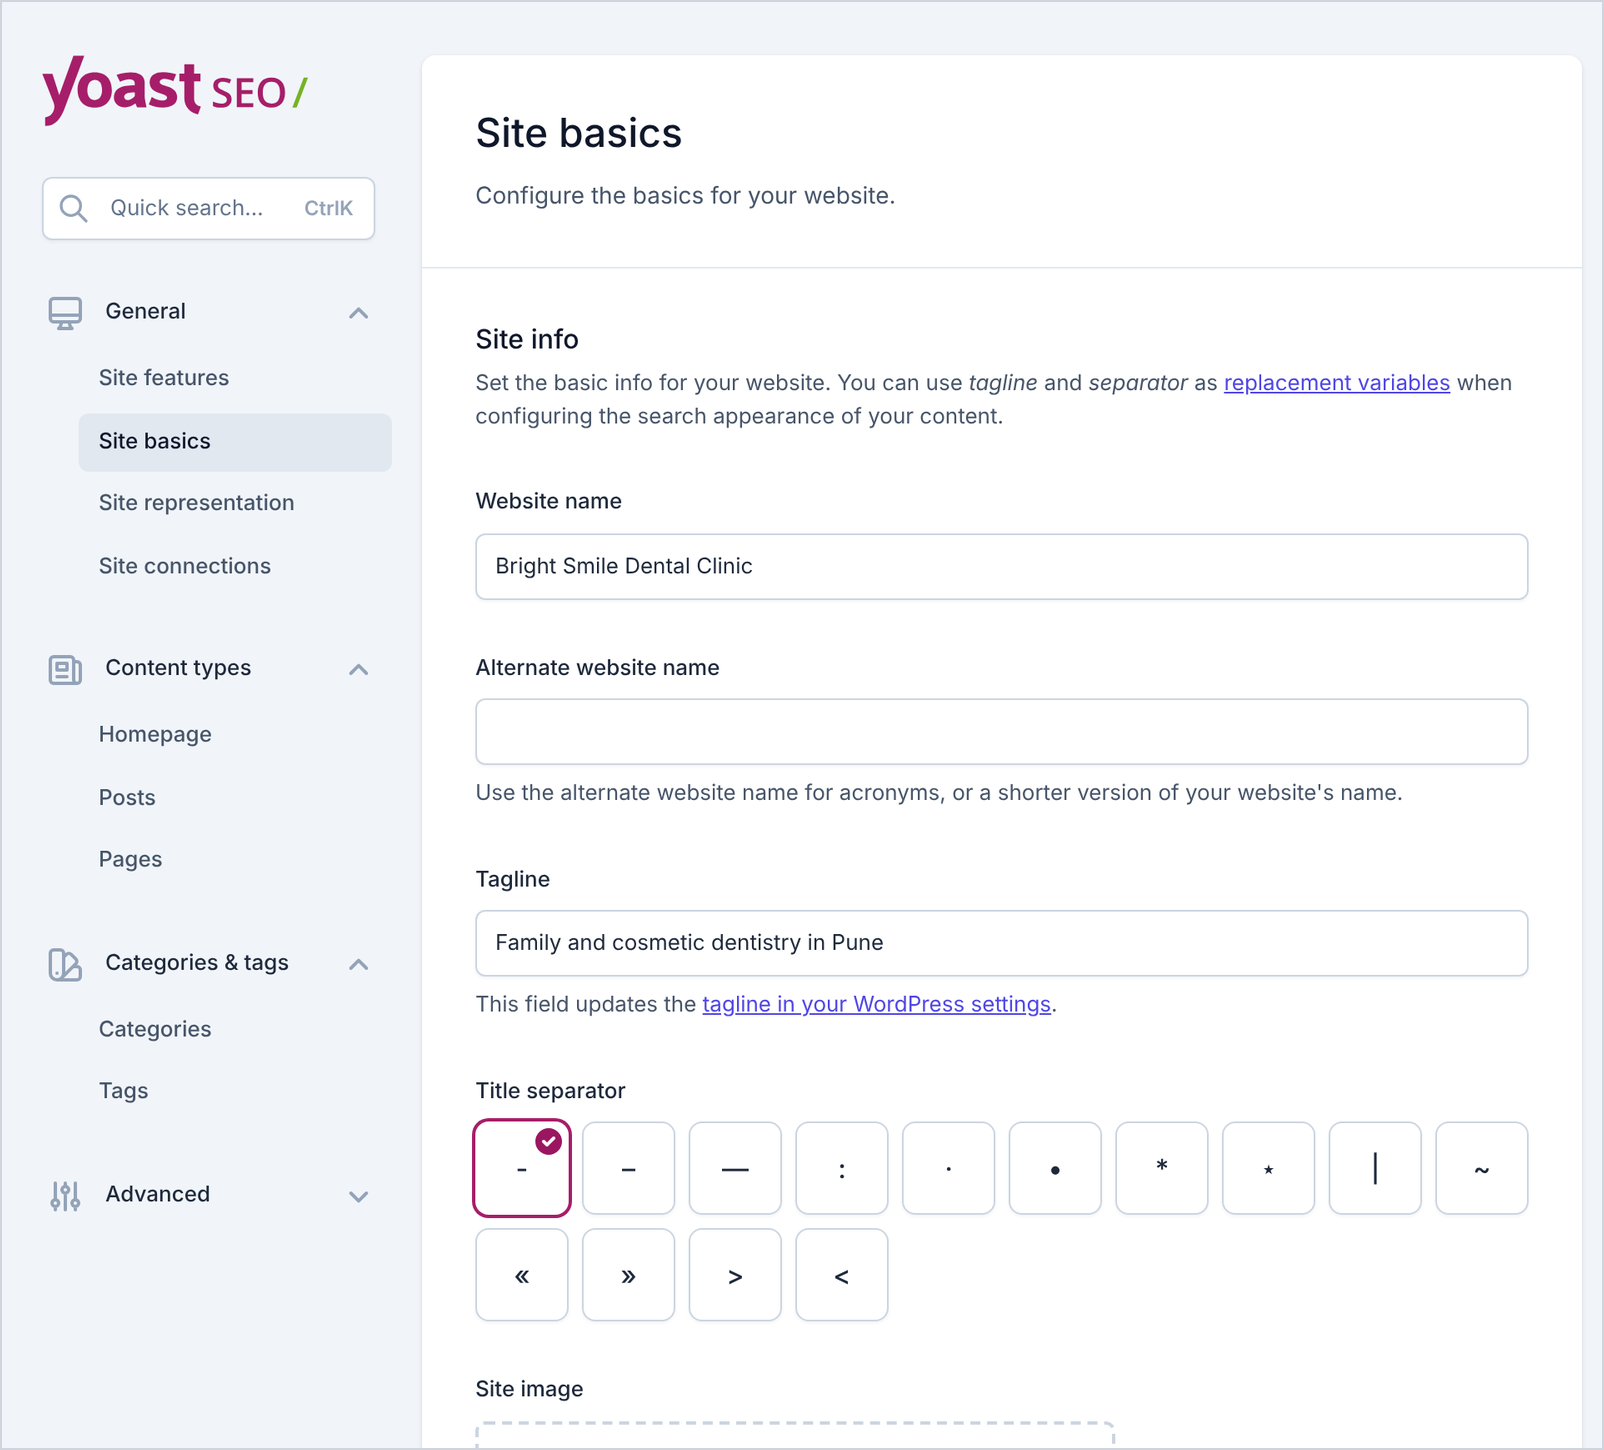
Figure 9: General → Site basics. The tagline here also updates your WordPress tagline.
Two more screens in the General group:
- Site representation shows the same organization or person details you entered in the first-time configuration.
- Site connections is where you paste verification codes for Google, Bing, Ahrefs, Pinterest, Baidu and Yandex. If you have already verified your site in Google Search Console another way, leave it empty.
Content types: how posts and pages appear in Google
Under Content types → Posts (and the matching Pages screen), you set the defaults for every post:
- Show posts in search results (marker 1). Keep this on. Switching it off adds a noindex tag to every post and removes them from your XML sitemap.
- SEO title (marker 2). The default template is Title – Page – Separator – Site title, which produces titles like “How Often Should You Visit the Dentist? – Bright Smile Dental Clinic”. You can override it for any single post.
- Meta description (marker 3). Leave the template empty and write a unique description for each important post (Step 4 shows how).
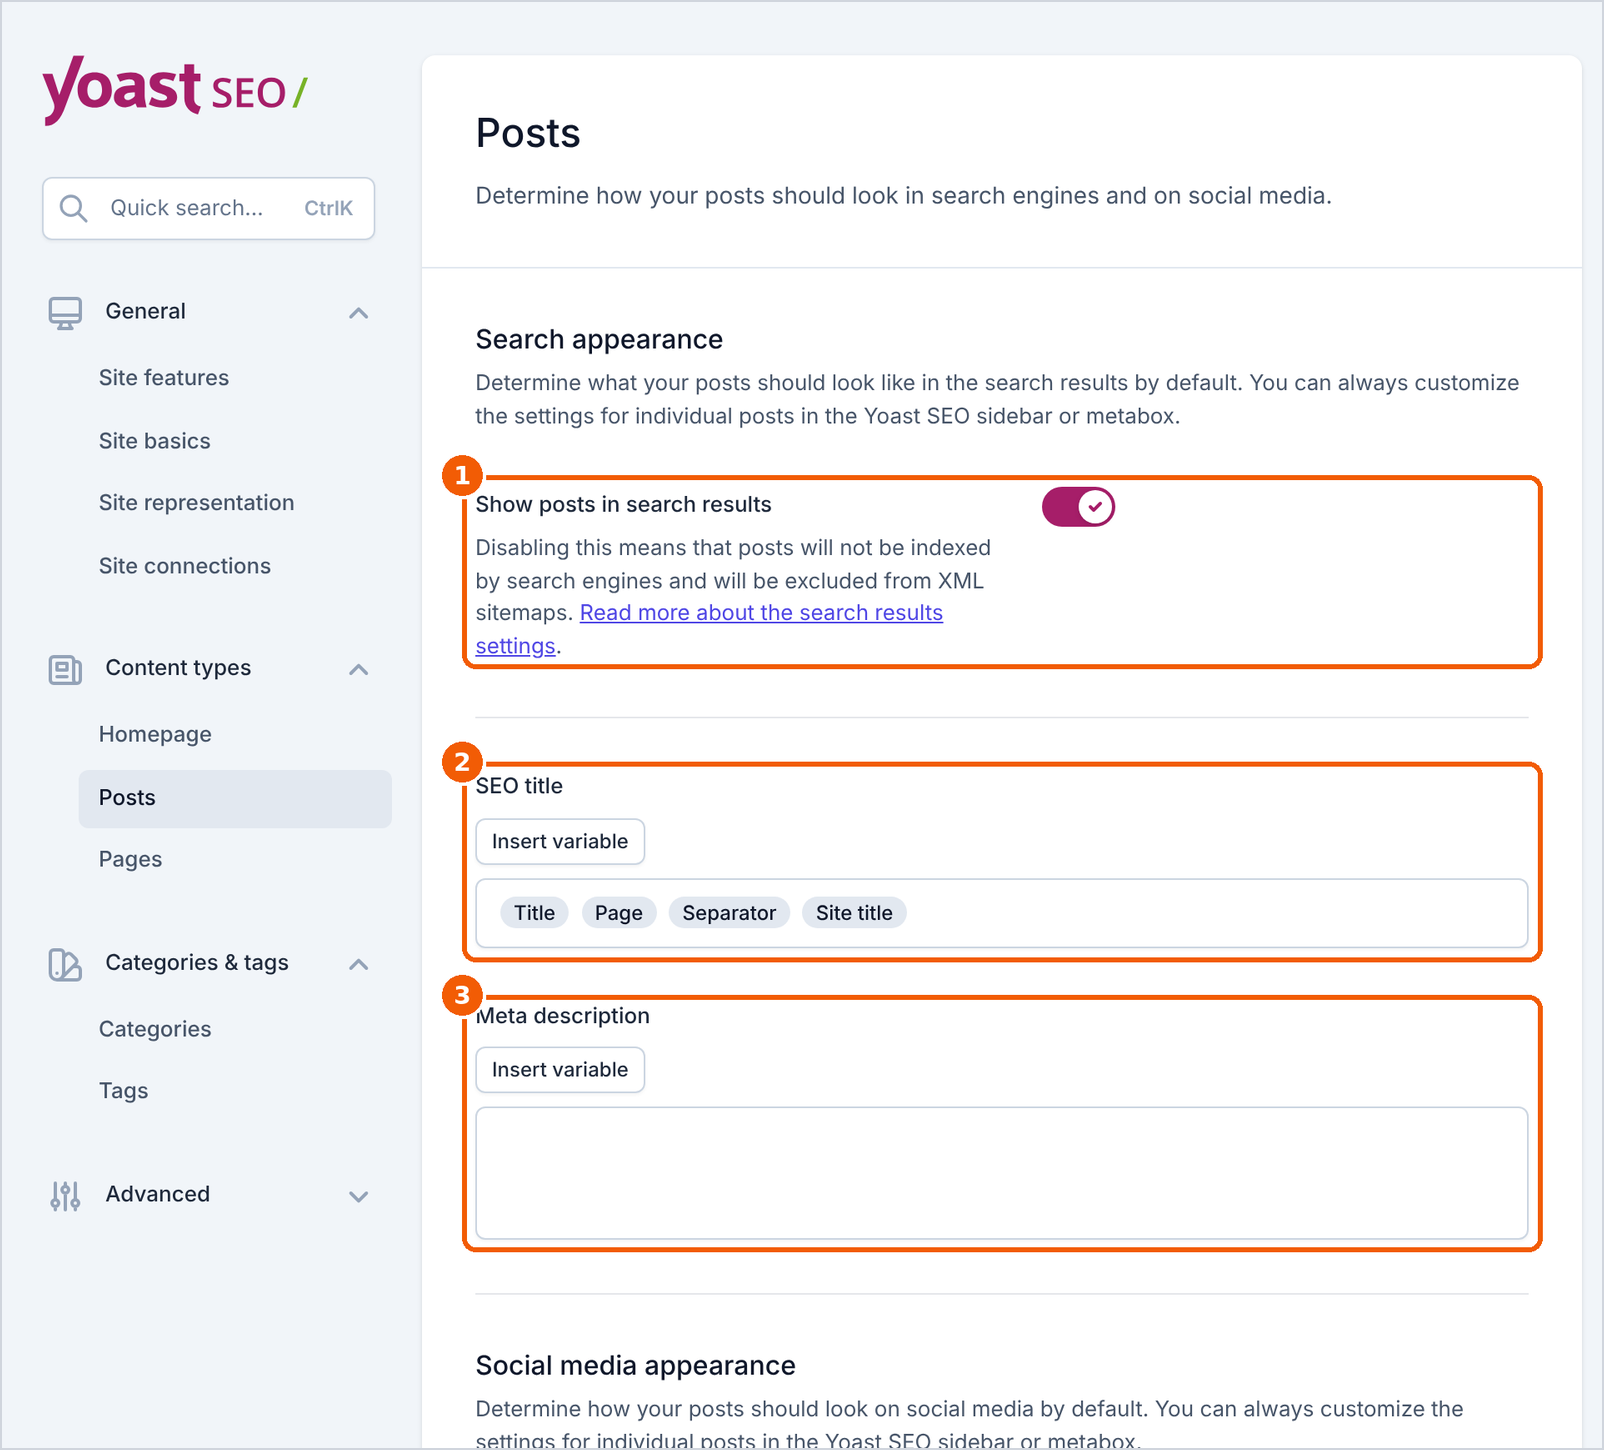
Figure 10: Content types → Posts. These defaults apply to every post unless you change them in the editor.
Further down the same screen, the Schema section sets the default page type (Web Page) and article type (Article). These defaults suit most blogs. The Homepage screen works the same way for your home page; if your homepage is a static page, edit its title and description on that page instead.
Categories and tags
Categories & tags has a screen for each taxonomy, each with a Show … in search results switch.
- Categories: keep them in search results if your category pages are useful hubs, for example “Dental Care” or “Law Firm SEO”.
- Tags: if you add many loosely related tags, consider switching tags off. Yoast’s own beginner guide recommends showing category archives and hiding tag archives to avoid thin, duplicate pages (Yoast).
- Show the categories prefix in the slug: WordPress adds /category/ to category URLs by default. Only change this on a new site; changing it later changes live URLs.
Advanced: breadcrumbs, archives, media pages and llms.txt
The Advanced group is collapsed by default. Click it to reveal ten screens. These are the ones worth a look:
- Breadcrumbs: sets the separator (» by default), the anchor text for your homepage (“Home”) and other labels. To show breadcrumbs on the page, add the Yoast breadcrumbs block in the editor, or switch on Enable breadcrumbs inserted in your theme’s template if your theme uses Yoast’s breadcrumb code. Yoast adds breadcrumb structured data to your pages either way.
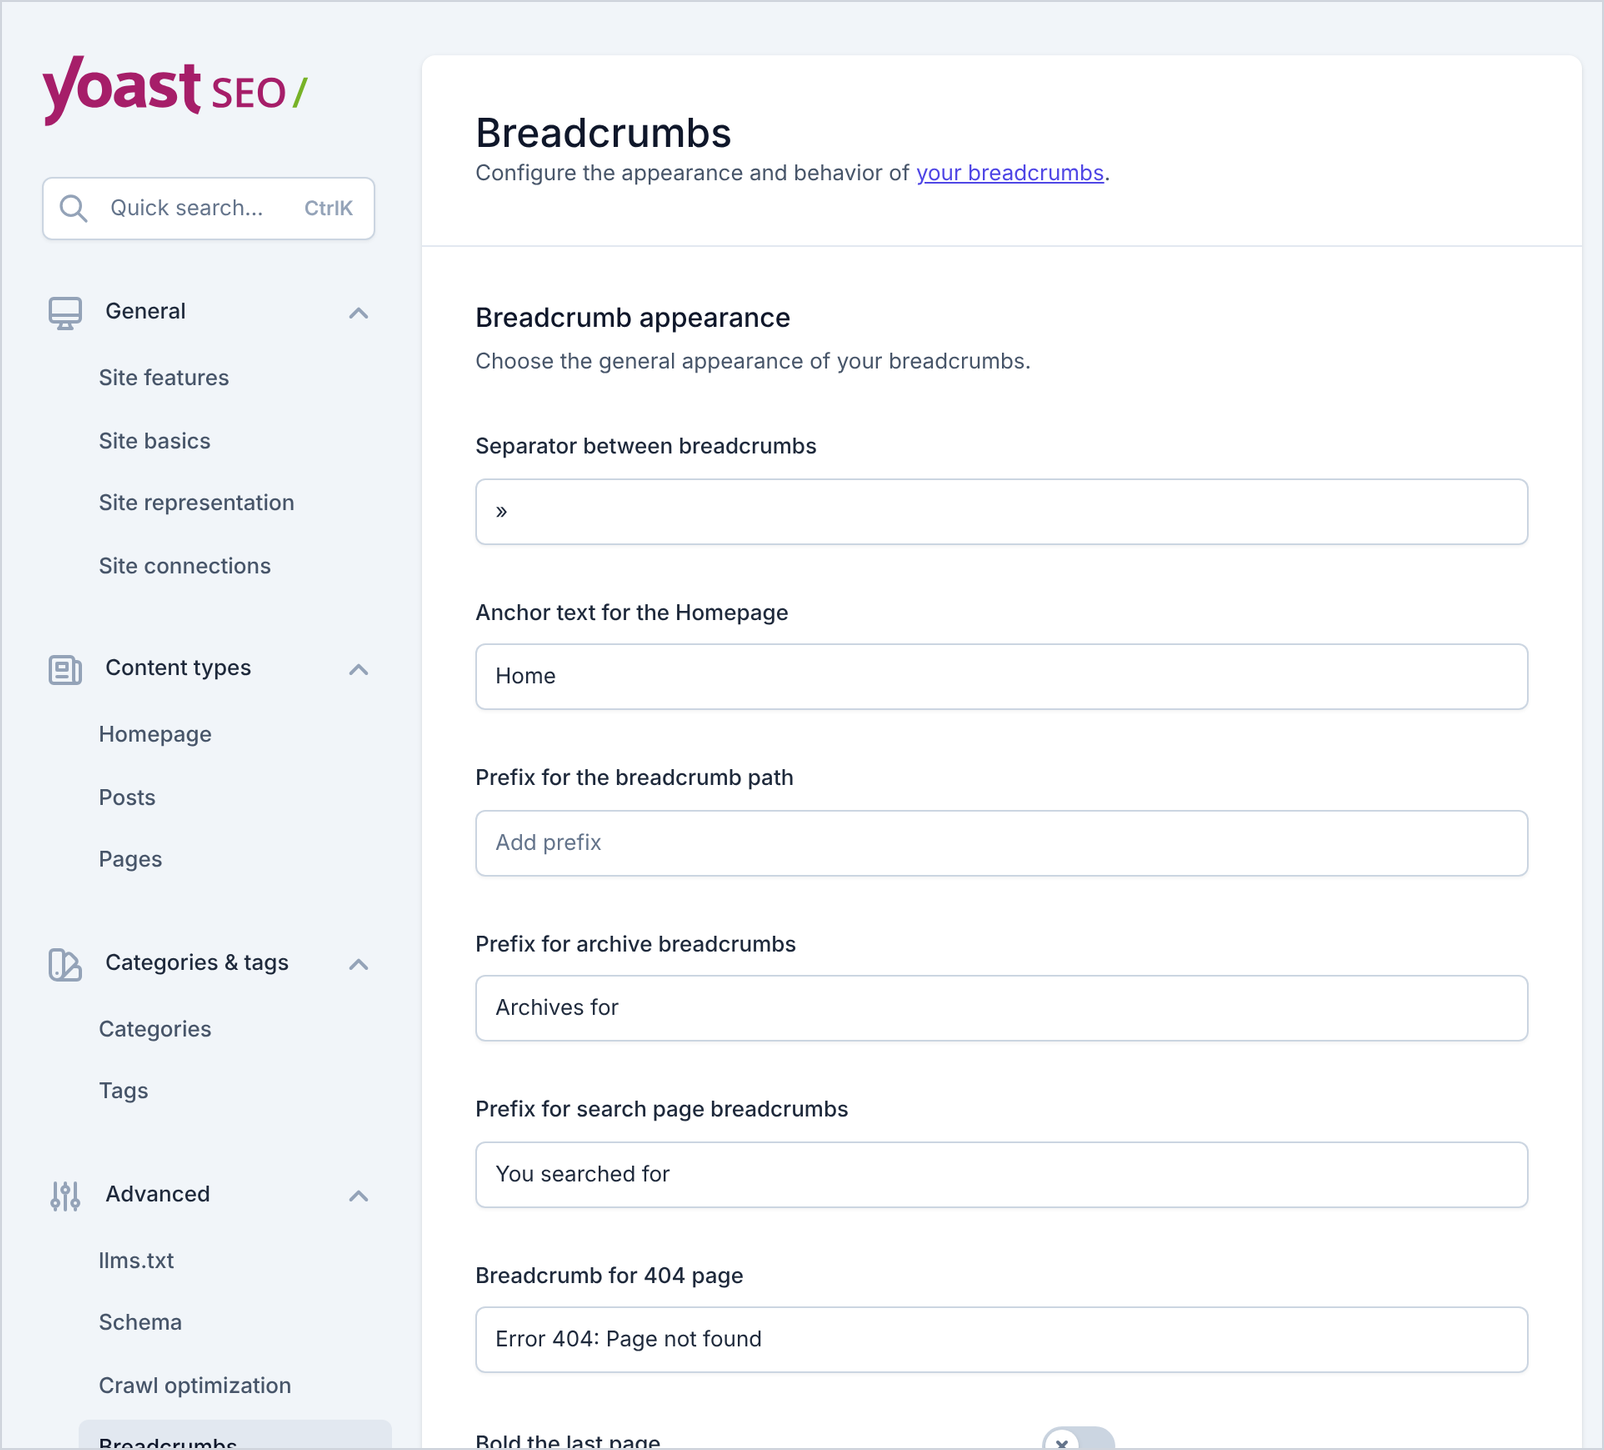
Figure 11: Advanced → Breadcrumbs. Labels for the breadcrumb trail shown to visitors.
- Author archives: on a one-author blog, the author archive repeats your blog page, which Yoast calls a duplicate content problem. Switch off Enable author archives (it then redirects to your homepage), or switch off Show author archives in search results.
- Date archives: pages such as /2026/ group posts only by date. Yoast recommends disabling them for most sites.
- Media pages: Yoast disables these empty attachment pages by default and redirects them to the image file itself. Leave them disabled.
- Crawl optimization: removes extra links WordPress adds to every page, such as shortlinks and oEmbed links. Yoast says most sites can switch them off safely, but leave this screen alone if you are not sure what a setting does.
- llms.txt: generates a weekly-updated file that lists your most important pages for AI assistants, with automatic or manual page selection. It is off by default.
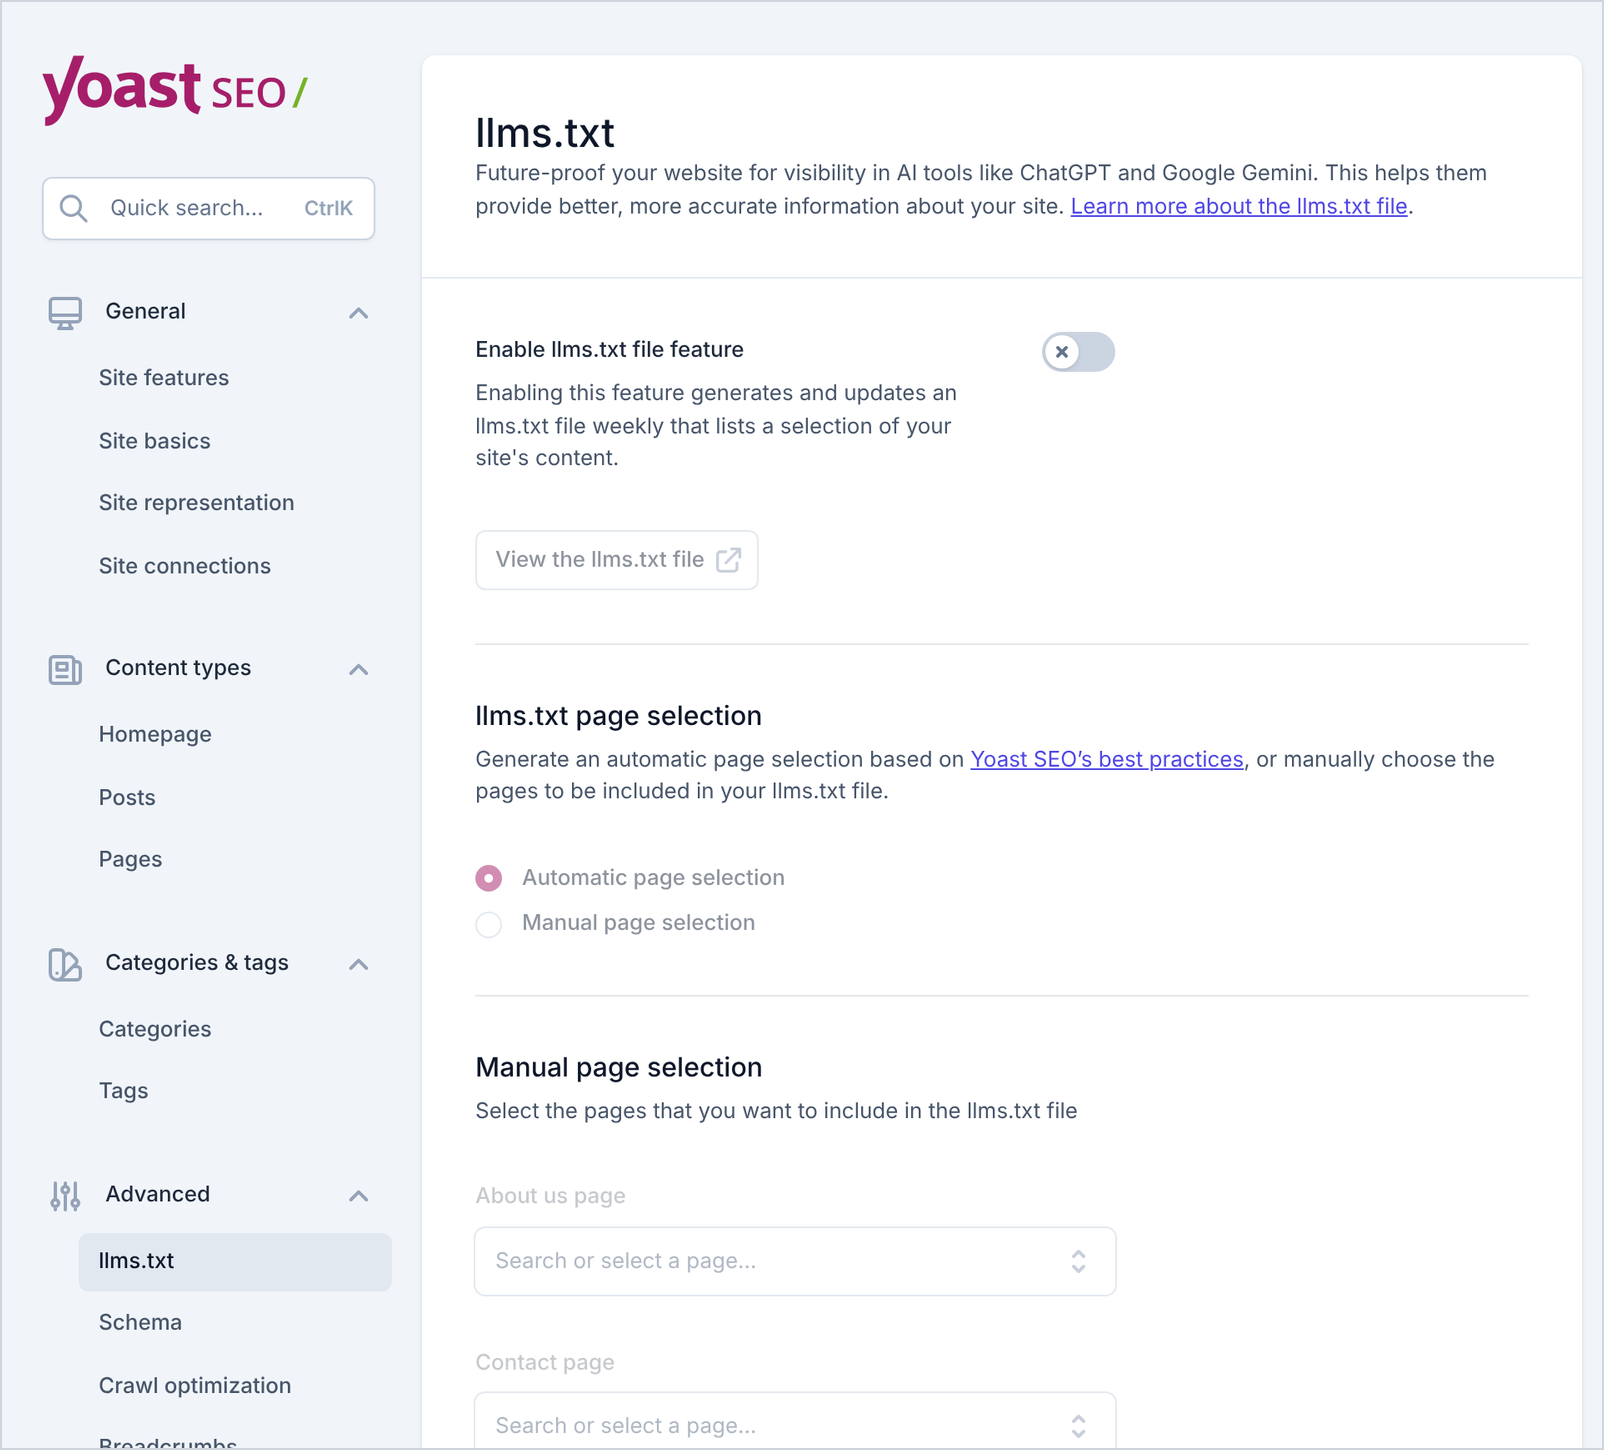
Figure 12: Advanced → llms.txt. Optional, and off by default.
Should you switch on llms.txt? It does no harm, but don’t expect a Google boost: Google says its search ignores llms.txt files and that you don’t need any AI text files to appear in AI Overviews or AI Mode (Google Search Central). Other AI tools may read it. For more on optimizing for AI answers, see SEO in the age of AI.
Step 4: Optimize a post with the Yoast sidebar
This is where you will spend most of your time with Yoast. We’ll optimize a real sample post, “How Often Should You Visit the Dentist?”, from its first draft to a green score.
4.1 Open the Yoast SEO sidebar
Open any post in the WordPress block editor. Click the Yoast icon in the top toolbar (marker 1), next to the Publish button. The Yoast SEO sidebar opens on the right (marker 2).
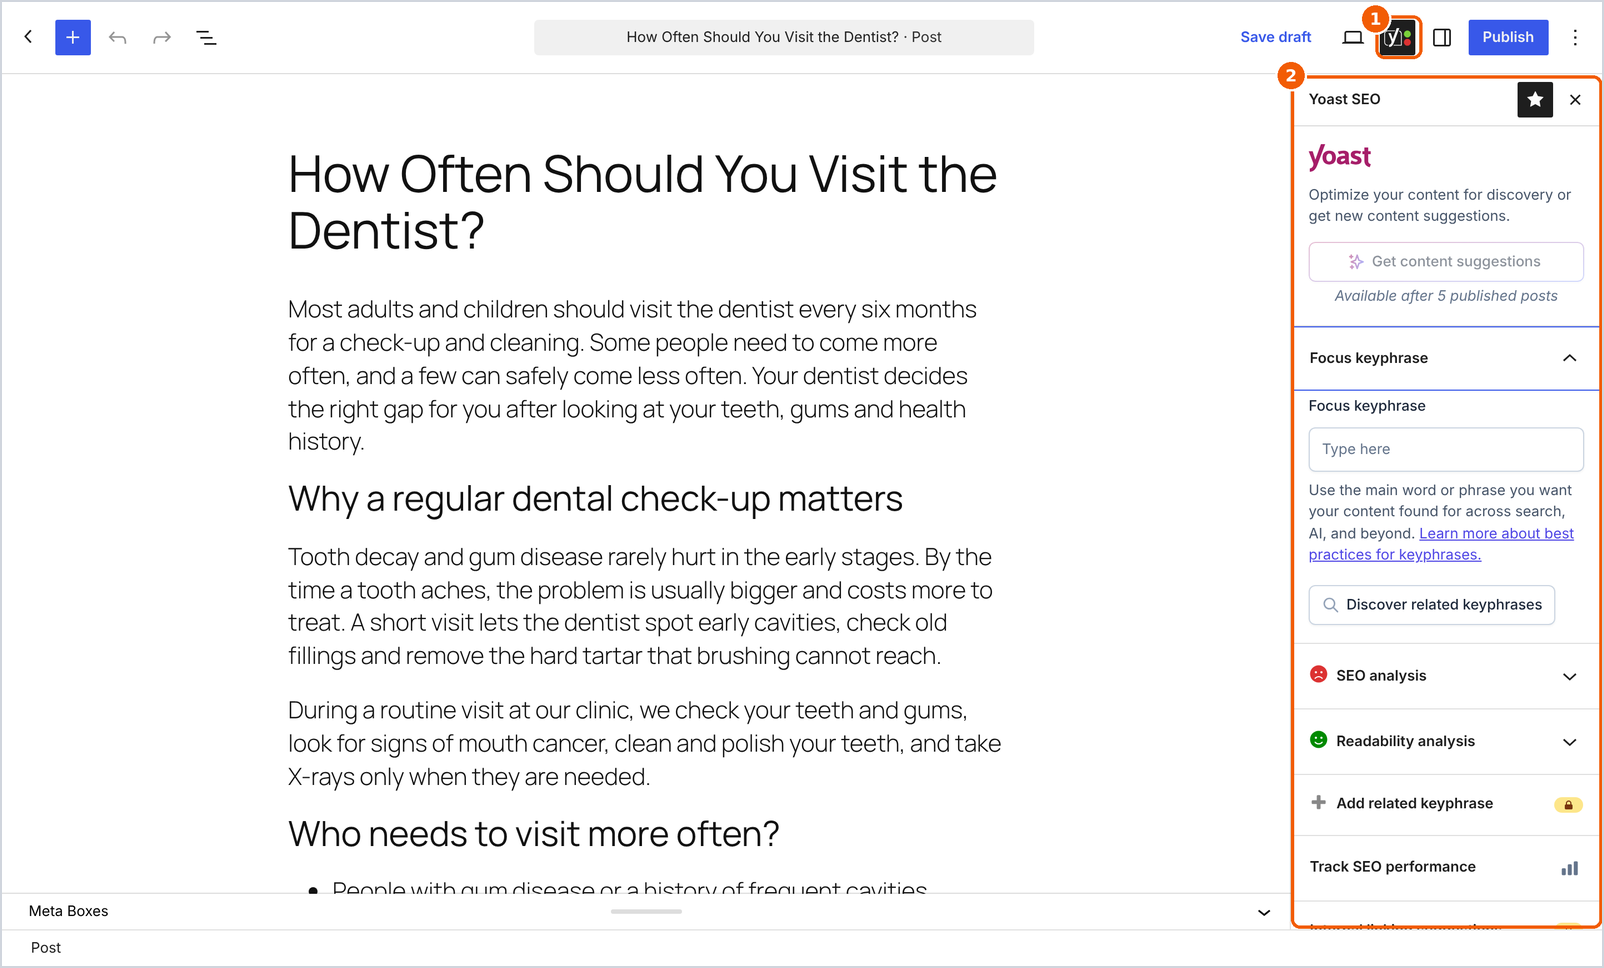
Figure 13: Click the Yoast icon in the toolbar to open the Yoast SEO sidebar.
The same tools also appear in a Yoast SEO box below your content, under Meta Boxes, with tabs for SEO, Readability, Schema and Social. Use whichever you prefer; both save the same settings. If you build pages with Elementor, Yoast works inside Elementor’s editor too.
4.2 Set a focus keyphrase
The focus keyphrase is the main search phrase you want this page to rank for. Every SEO check Yoast runs is measured against it, so choose it first.
Type it into the Focus keyphrase field (marker 1). Within a second, the SEO analysis heading below gets a coloured face (marker 2): red, orange or green.
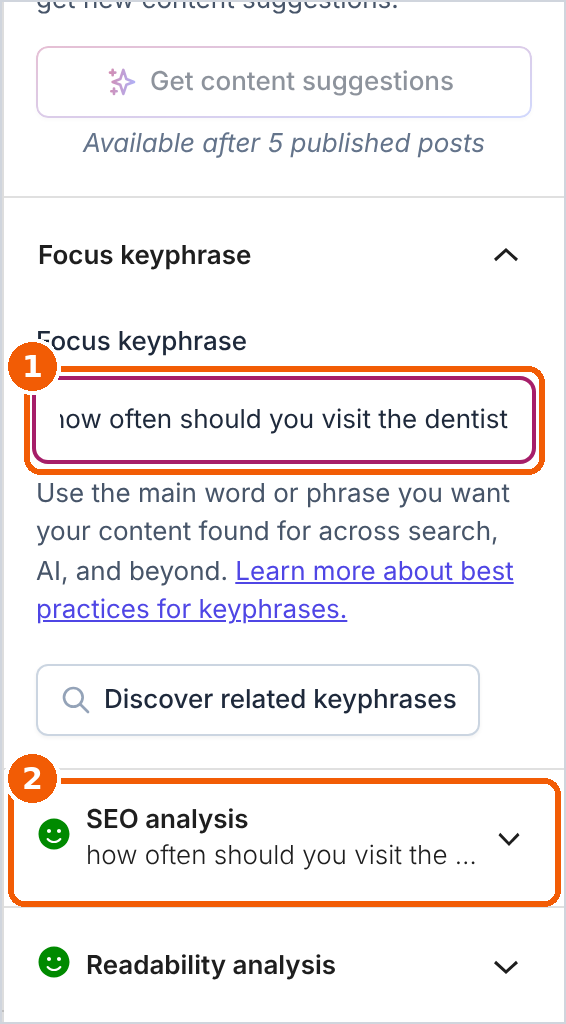
Figure 14: Enter your focus keyphrase. The SEO analysis score updates immediately.
How to choose a good focus keyphrase:
- Use a phrase real people search for. Check it with a keyword tool or Yoast’s Discover related keyphrases button, which shows related keywords from Semrush once you connect a Semrush account. Our guide on how to do keyword research explains the process.
- Match the search intent: if people searching it want a quick answer, give one.
- Use each keyphrase on one page only. Yoast warns you if you have already used it, because two of your pages targeting the same phrase compete with each other.
- Longer, specific phrases are easier to rank for. “How often should you visit the dentist” is easier to win than “dentist”. See short-tail vs long-tail keywords.
4.3 Read and fix the SEO analysis
Click SEO analysis to open the full list of checks. They are grouped into Problems (red), Improvements (orange) and Good results (green). Each check name is a link to Yoast’s explanation, and the eye icon (“Highlight this result in the text”) marks the matching words in your post.
Our first draft had 5 problems and 2 improvements. After fixing them, only 1 problem and 1 improvement were left, and 15 checks were green:
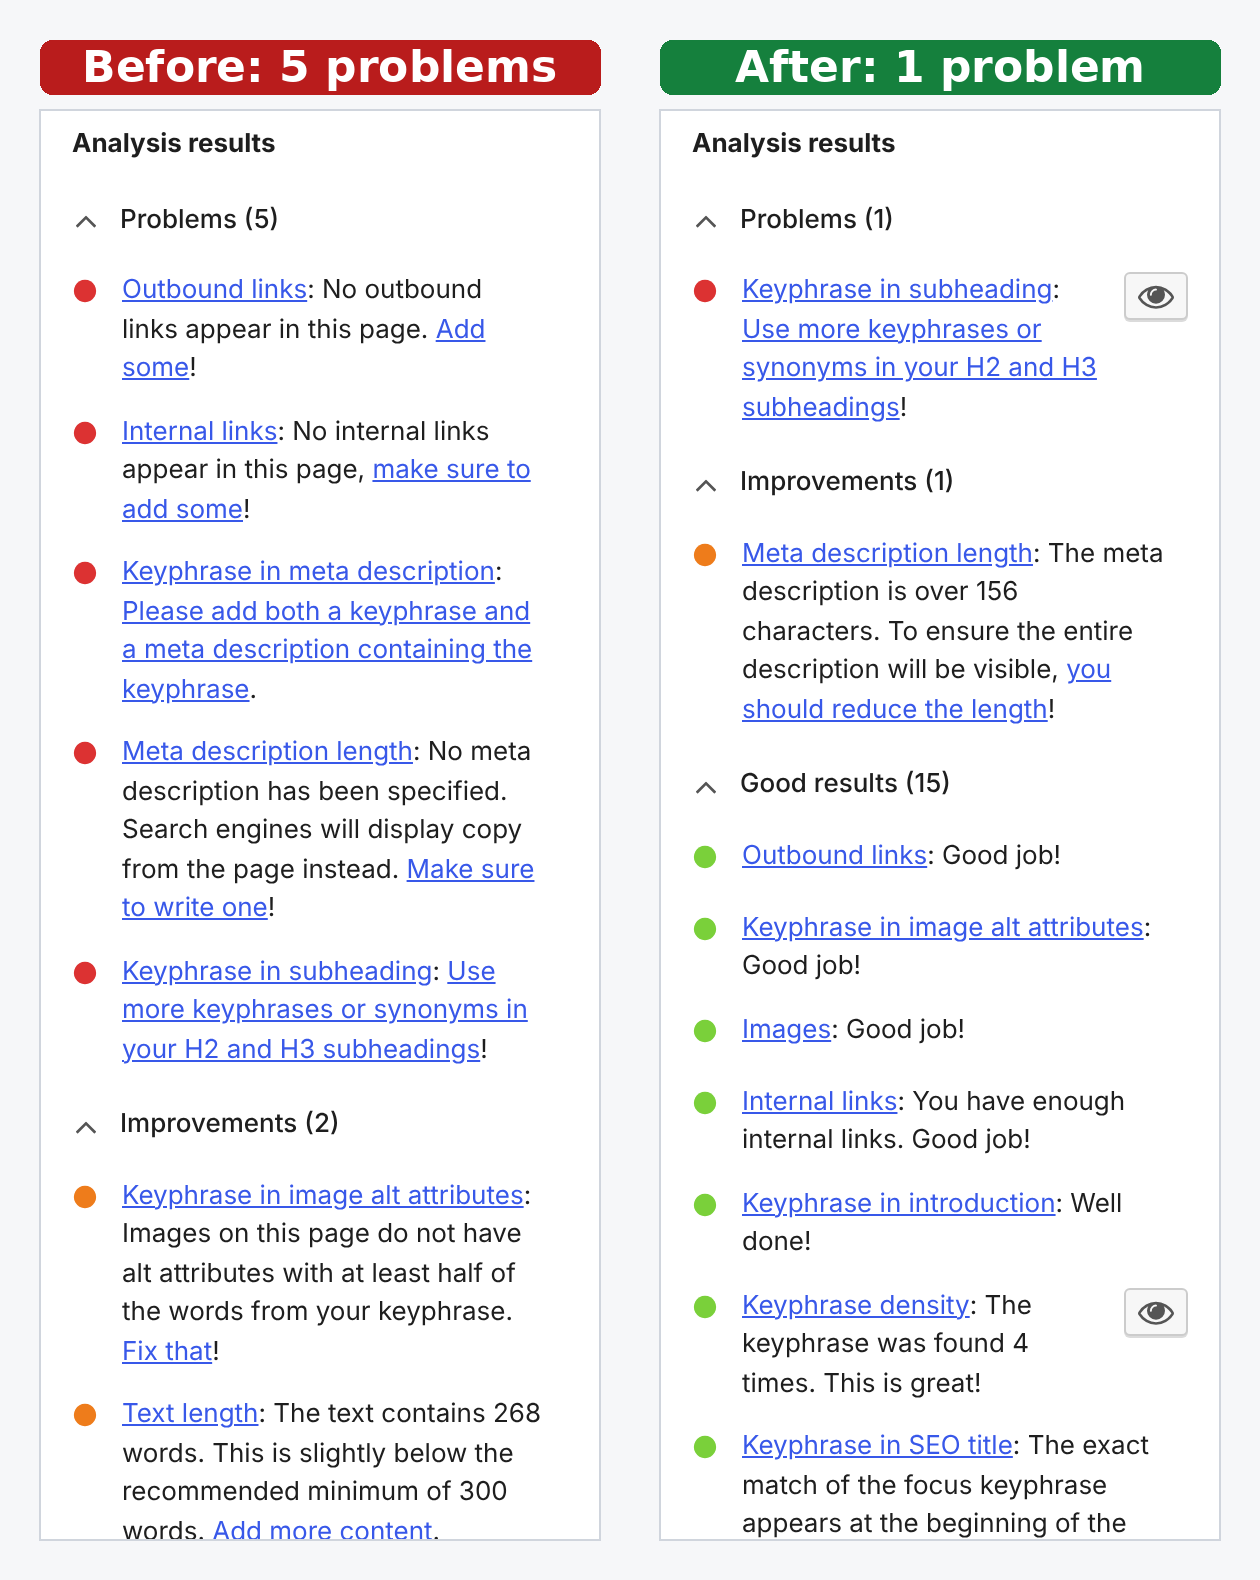
Figure 15: The same post before and after fixing the issues Yoast flagged.
Here is exactly what we changed:
| Yoast check | What it said in the first draft | How we fixed it |
|---|---|---|
| Outbound links | No outbound links appear in this page | Linked to the World Health Organization’s oral health fact sheet as a trusted source |
| Internal links | No internal links appear in this page | Linked to a related post on the same site, “foods that are good for your teeth” (internal linking strategy) |
| Keyphrase in meta description | Add both a keyphrase and a meta description | Wrote a meta description that starts with the keyphrase (see 4.5) |
| Meta description length | No meta description has been specified | Same fix as above |
| Keyphrase in subheading | Use more keyphrases or synonyms in your H2 and H3 subheadings | Rewrote one H2 as “How often should you visit the dentist if you are at higher risk?” |
| Keyphrase in image alt attributes | Images don’t have alt attributes with at least half of the words from the keyphrase | Added an image whose alt text includes the keyphrase (image SEO) |
| Text length | 268 words, below the recommended minimum of 300 | Added a useful section on habits between visits; the post grew to 347 words |
Two items stayed open, and that is fine:
- Keyphrase in subheading is still red because only 1 of our 5 subheadings contains the keyphrase. Yoast gives a green light when 30 to 75% of your H2 and H3 subheadings use it (Yoast). We could rewrite one more heading, but not if it makes the heading read worse.
- Meta description length turned orange: “The meta description is over 156 characters.” Our description was only 152 characters, but for a post the Google preview puts the publish date in front of it, and the length check counted that too. Yoast’s green range is 120 to 156 characters (Yoast), so for posts that show a date, aim for about 135 to 140 characters.
The overall score was still Good, because Yoast weighs all the checks together. You don’t need every bullet green. You need a page that answers the searcher’s question well, with the main issues fixed.
4.4 Check the readability analysis
Click Readability analysis in the same sidebar. These checks look at how easy your text is to read: sentence length, paragraph length, subheading distribution, passive voice, transition words and repeated sentence beginnings. Yoast’s passive voice threshold is 10% of your sentences (Yoast).
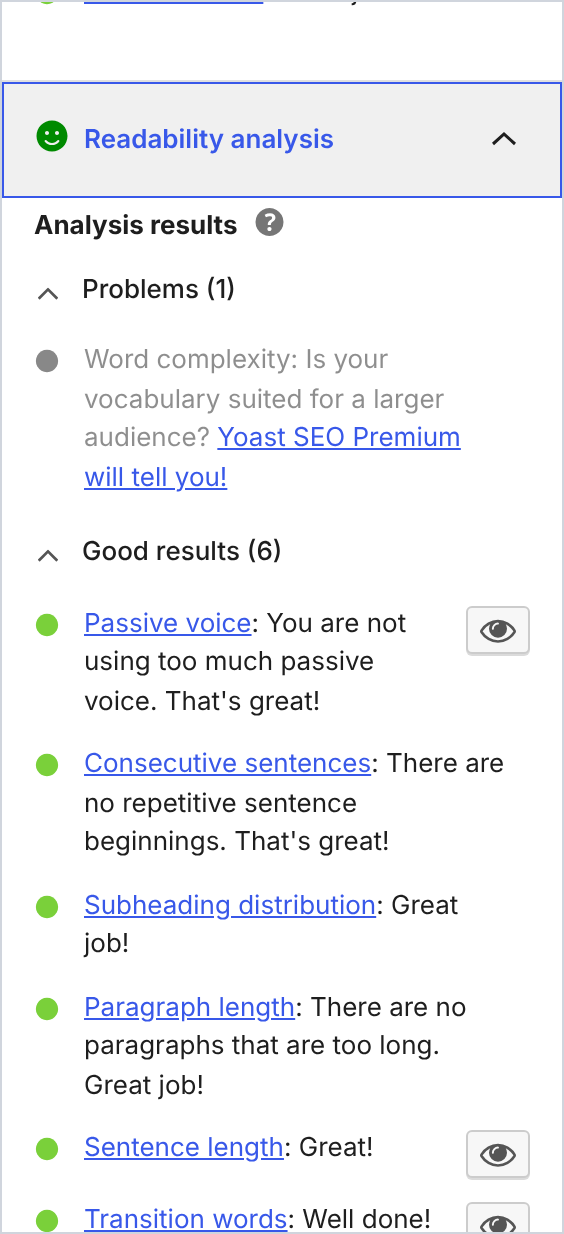
Figure 16: Readability analysis for the sample post. Word complexity is a Premium check, so it stays grey in the free version.
Our post scored 6 good results. The one grey “problem”, Word complexity, is a Premium-only check, so free users can ignore it.
4.5 Write your SEO title and meta description
Click Search appearance in the sidebar. A window opens with a live Google preview (marker 1), showing how your post may look in search results. Switch between Mobile and Desktop with the toggle at the top right.
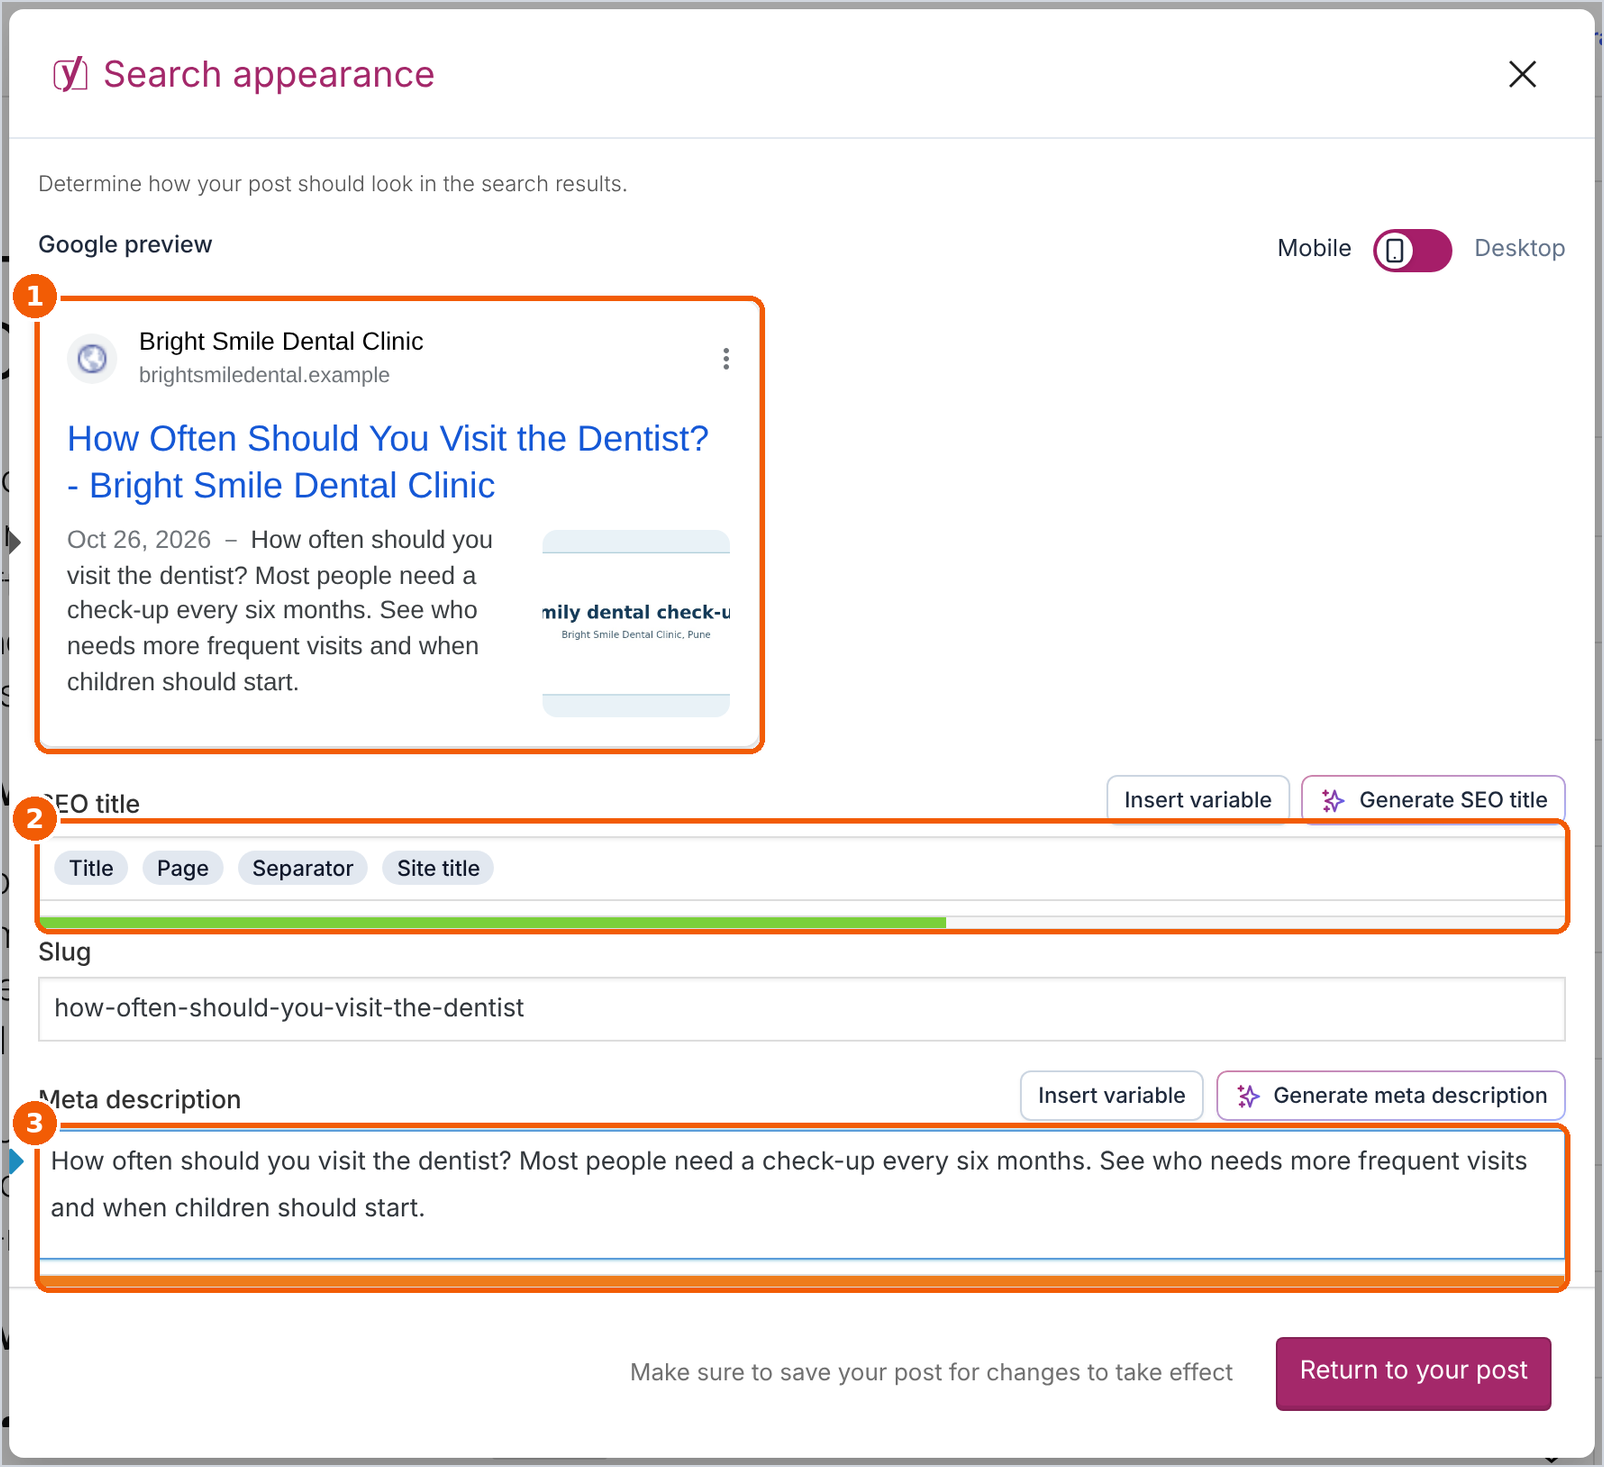
Figure 17: Search appearance. Edit the SEO title and meta description and watch the Google preview update.
- SEO title (marker 2): built from the template you set in Step 3. The bar underneath turns green when the length fits. Keep the keyphrase near the start; see our guide to SEO title tags.
- Slug: the URL ending. Keep it short and include the keyphrase.
- Meta description (marker 3): one or two sentences that make people want to click. Include the keyphrase and stay inside the green length. Our meta description guide has examples.
The Generate SEO title and Generate meta description buttons use Yoast AI, which is part of Premium. In the free version, write them yourself. Remember that Google may still show a different snippet; Yoast itself notes there is no guarantee Google will use the description you write (Yoast).
Social media appearance, the next item in the sidebar, lets you choose a social image, title and description for sharing on Facebook, LinkedIn, WhatsApp and similar apps. The live social preview is a Premium feature. If you leave these fields empty, Yoast uses your featured image, SEO title and meta description.
4.6 Schema, Advanced and Cornerstone content
Three more panels in the sidebar control how Google understands and treats this one page:

Figure 18: The Schema, Advanced and Cornerstone content panels in the Yoast sidebar.
- Schema: Yoast automatically describes the page with schema.org markup. The defaults (Web Page and Article for posts) are right for blog posts. Change the page type only for special pages, such as a contact, about or FAQ page. Learn more in structured data and schema basics.
- Advanced: Allow search engines to show this content in search results? Choose No to noindex a single page, such as a thank-you page. Should search engines follow links on this content? Leave it on Yes. Canonical URL is only for pages that are copies of another page; see canonical tags explained. Leave the rest empty unless you know you need it.
- Cornerstone content: switch on Mark as cornerstone content for your most important, in-depth guides. Yoast then checks them more strictly and lets you filter them in your posts list, which helps you link to them from other posts.
4.7 Publish and check the pre-publish summary
Click Publish in the toolbar. Before the post goes live, WordPress shows a pre-publish panel, and Yoast adds its own summary to it (marker 1). Our post showed “SEO analysis: Good” and “Readability analysis: Good”. Click Publish again (marker 2) to go live.

Figure 19: Yoast’s summary in the WordPress pre-publish panel, a final check before the post goes live.
Step 5: Track your scores and fix posts in bulk
Once you have published a few posts, Yoast helps you find which ones still need work.
In the Posts list
Go to Posts → All Posts. Yoast adds coloured dots for each post’s SEO score and Readability score (marker 1). You can filter the list by score with the All SEO Scores and All Readability Scores menus (marker 2), for example to show only posts that need improvement. The last two columns count each post’s outgoing and received internal links (marker 3).

Figure 20: Score dots, score filters and internal link counts in the Posts list.
In our demo, the dental check-up post scores Good, the teeth whitening post scores OK, and the third post has no focus keyphrase yet, so it has no SEO score. A post that receives 0 internal links is hard for visitors and Google to find, so link to it from related posts.
On the Yoast dashboard
Yoast SEO → General → Dashboard shows the same information as charts: how many posts and pages have good, OK or poor SEO and readability scores. Filter by content type or category, and click View to open the matching posts.

Figure 21: SEO and readability scores across the whole site on the Yoast dashboard.
The same area has a Task list, Yoast’s to-do list for your site (for example, “Improve default meta descriptions of your recent content”). The dashboard can also show Google Search Console and Analytics data once you connect Site Kit by Google (Step 7).
With the bulk editor
To edit many titles and descriptions at once, go to Yoast SEO → Tools → Bulk editor. Choose Posts or Pages, then edit the focus keyphrase, SEO title and meta description for each item from one table. The Social appearance tab does the same for social titles and descriptions.

Figure 22: Tools → Bulk editor. Spot missing meta descriptions and fix them in one place.
The bulk editor is free; Premium adds AI drafts of the metadata for you to approve. It is the quickest way to find and fill empty meta descriptions on older posts.
Step 6: Find your XML sitemap and submit it to Google
Yoast creates your XML sitemap automatically and keeps it updated whenever you publish. Open it at yourdomain.com/sitemap_index.xml, or go to Yoast SEO → Settings → Site features and click View the XML sitemap under XML sitemaps.

Figure 23: The sitemap index links to one sitemap per content type.
The index links to a separate sitemap for each content type that is shown in search results: posts, pages, categories and so on. Anything you set to “not shown in search results” in Step 3 is left out automatically. If you switched from another SEO plugin, remove its old sitemap from Search Console and submit Yoast’s instead.
To help Google find your pages faster:
- Open Google Search Console and select your website.
- Go to Indexing → Sitemaps.
- Enter sitemap_index.xml and click Submit.
- Do the same in Bing Webmaster Tools, which also powers Microsoft Copilot answers.
More background: XML sitemaps explained and indexing issues and fixes.
Step 7: Connect integrations (optional)
Yoast SEO → Integrations connects Yoast to other tools. Three are recommended:

Figure 24: Yoast’s recommended integrations: Semrush, Wincher and Site Kit by Google.
- Semrush: powers the Discover related keyphrases button in the editor, so you can see related keywords and their search volume without leaving your post. You sign in with a Semrush account.
- Wincher: tracks your Google rankings for your focus keyphrases over time (the Track SEO performance item in the sidebar). It needs a Wincher account.
- Site Kit by Google: brings Google Search Console and Analytics data into your Yoast dashboard. Click Install Site Kit by Google and follow its setup.
Further down the page, Yoast detects other plugins it works with, such as WooCommerce, Elementor and Advanced Custom Fields. You don’t need any integration for Yoast to work; add them only when you will actually use the data.
Yoast SEO Premium: what you get and is it worth it?
Yoast SEO Premium costs $118.80 a year for one site, excluding VAT (Yoast). Yoast’s own upgrade box inside the plugin mentions a 30-day money-back guarantee. Premium adds:
- Up to 5 focus keyphrases per page, with synonyms and word forms recognized
- Yoast AI to generate titles and meta descriptions, suggest keyphrase improvements and summarize posts, with no separate AI credits to buy
- Redirect manager, which offers to create a redirect when you move or delete a page, so visitors don’t hit 404 errors
- Internal linking suggestions while you write
- Social media previews and extra checks such as word complexity
- Local SEO, News SEO and Video SEO add-ons, plus 24/7 support and the Yoast SEO Academy
Stay on the free version if you run a small blog or business site, publish a few posts a month and rarely change URLs. Everything in Steps 1 to 7 works for free.
Consider Premium if you publish often, manage many pages, regularly delete or move content (the redirect manager alone saves broken links), or want AI help writing metadata across many posts. Check the current price and features on Yoast’s site before buying, as plans change.
7 Yoast SEO mistakes to avoid
- Chasing every green bullet. Yoast’s checks are guidelines, not ranking rules. Don’t stuff your keyphrase into headings or sentences where it reads badly; the keyphrase density check also flags overuse.
- Treating a green score as a ranking guarantee. Yoast checks your on-page basics. Rankings still depend on how useful your content is, your links and your E-E-A-T.
- Using the same focus keyphrase on several posts. Your own pages then compete with each other. Give each page its own topic and keyphrase.
- Leaving meta descriptions empty on important pages. Prioritize your homepage, service pages and top posts. The bulk editor makes this quick.
- Accidentally hiding pages from Google. Check that Show posts in search results is on (Step 3), that the post’s Advanced panel is set to Yes, and that Settings → Reading → Discourage search engines from indexing this site is unticked in WordPress itself.
- Running two SEO plugins. You get duplicate titles, descriptions and schema. Keep one.
- Not updating the plugin. Yoast ships updates on a two-week cycle (WordPress.org). Keep it updated for fixes and new search features.
Frequently asked questions
Is Yoast SEO free?
Yes. The free version includes the SEO and readability analysis, Google preview, XML sitemaps, schema, breadcrumbs and the bulk editor. Yoast SEO Premium costs $118.80 a year per site, excluding VAT.
What is a focus keyphrase in Yoast SEO?
It is the main search phrase you want a page to rank for. Yoast checks your title, introduction, headings, slug, meta description and image alt text against it. The free version allows one focus keyphrase per page.
Do I need all green lights in Yoast?
No. Aim for a green overall score, then use judgment on the remaining bullets. In our example, the post scored Good with one red and one orange item left. Never make your writing worse just to turn a bullet green.
Does a green Yoast score mean I will rank on Google?
No. Yoast checks on-page basics. Google ranks pages on many more signals, especially how helpful the content is and how trusted the site is.
Yoast SEO or Rank Math: which is better?
Both handle the essentials well. Yoast is the most-installed, with over 10 million active sites, against more than 4 million for Rank Math on WordPress.org. Pick one and stick with it, because switching later means migrating settings. If you switch, use Yoast’s import tool under Tools → Import and Export.
How do I add breadcrumbs with Yoast?
Add the Yoast breadcrumbs block where you want the trail to appear, or, for themes that support it, enable breadcrumbs under Settings → Advanced → Breadcrumbs. Yoast outputs breadcrumb structured data either way.
Does Yoast SEO work with Elementor and the classic editor?
Yes. In the classic editor, Yoast appears as a box below your content. In Elementor, Yoast’s analysis is available inside the Elementor editor.
Does Yoast help with AI search such as Google AI Overviews and ChatGPT?
Indirectly. Yoast helps with the basics that AI search relies on: indexable pages, clear titles and descriptions, and structured data. Google says there are no extra requirements or special files needed to appear in its AI features (Google Search Central).
Your Yoast SEO setup checklist
Yoast SEO does the technical work in the background and gives you a clear checklist for every post. Set it up once, then make the editor routine a habit:
- ☐ Install and activate Yoast SEO (only one SEO plugin on the site)
- ☐ Complete the 5-step first-time configuration
- ☐ Check Site features, Site basics and the Posts and Pages content types
- ☐ Decide on tag, author and date archives
- ☐ Submit sitemap_index.xml to Google Search Console and Bing Webmaster Tools
- ☐ For every new post: set a focus keyphrase, fix red and orange items, write the SEO title and meta description
- ☐ Once a month: filter the Posts list for “Needs improvement” and fill empty descriptions in the bulk editor
For a deeper checklist beyond Yoast, use our on-page SEO checklist and technical SEO checklist.
Want someone to check your WordPress SEO setup for you? Get a free SEO audit and I’ll show you what to fix first.
Sources
- WordPress.org, Yoast SEO plugin page: version 28.7, installs, ratings and feature list
- Yoast, Yoast SEO Premium: price and Premium features
- Yoast, Yoast SEO free vs Premium
- Yoast, How to create a good meta description: the 120–156 character range
- Yoast, How to use headings on your site: the 30–75% subheading rule
- Yoast, Readability analysis
- Yoast, Beginner’s guide to Yoast SEO
- Google Search Central, Optimizing your website for generative AI features and AI features and your website
Screenshots: a demo WordPress 7.1.3 site running Yoast SEO 28.7, captured on October 26, 2026. Menus and labels may change in later versions.